 Walkthrough
Walkthrough / The guide
Make the workflow yours.
For realtors and listing assistants who want their photos to upload in the right order. From your first folder to reusable naming rules, a complete guide to the workspace, keyboard, Settings, and exports.
Start with a photo folder
Choose Open or press ⌘O and select a folder containing JPG or JPEG files. New imports use photos directly inside that folder. Walkthrough saves the job and its organization in this Mac’s private library. The six-step Getting Started walkthrough introduces the sidebar, group renaming, pane controls, naming, and export. Replay it anytime from Help → Getting Started.
The room sidebar has All Photos, Ungrouped, and your ordered rooms, with a photo count beside each. Select a room to work with just its photos. Arrow keys, range selection, Select All, and the preview filmstrip follow that scope. Switching rooms clears the previous selection. All Photos keeps the complete listing available, including collapsed groups.
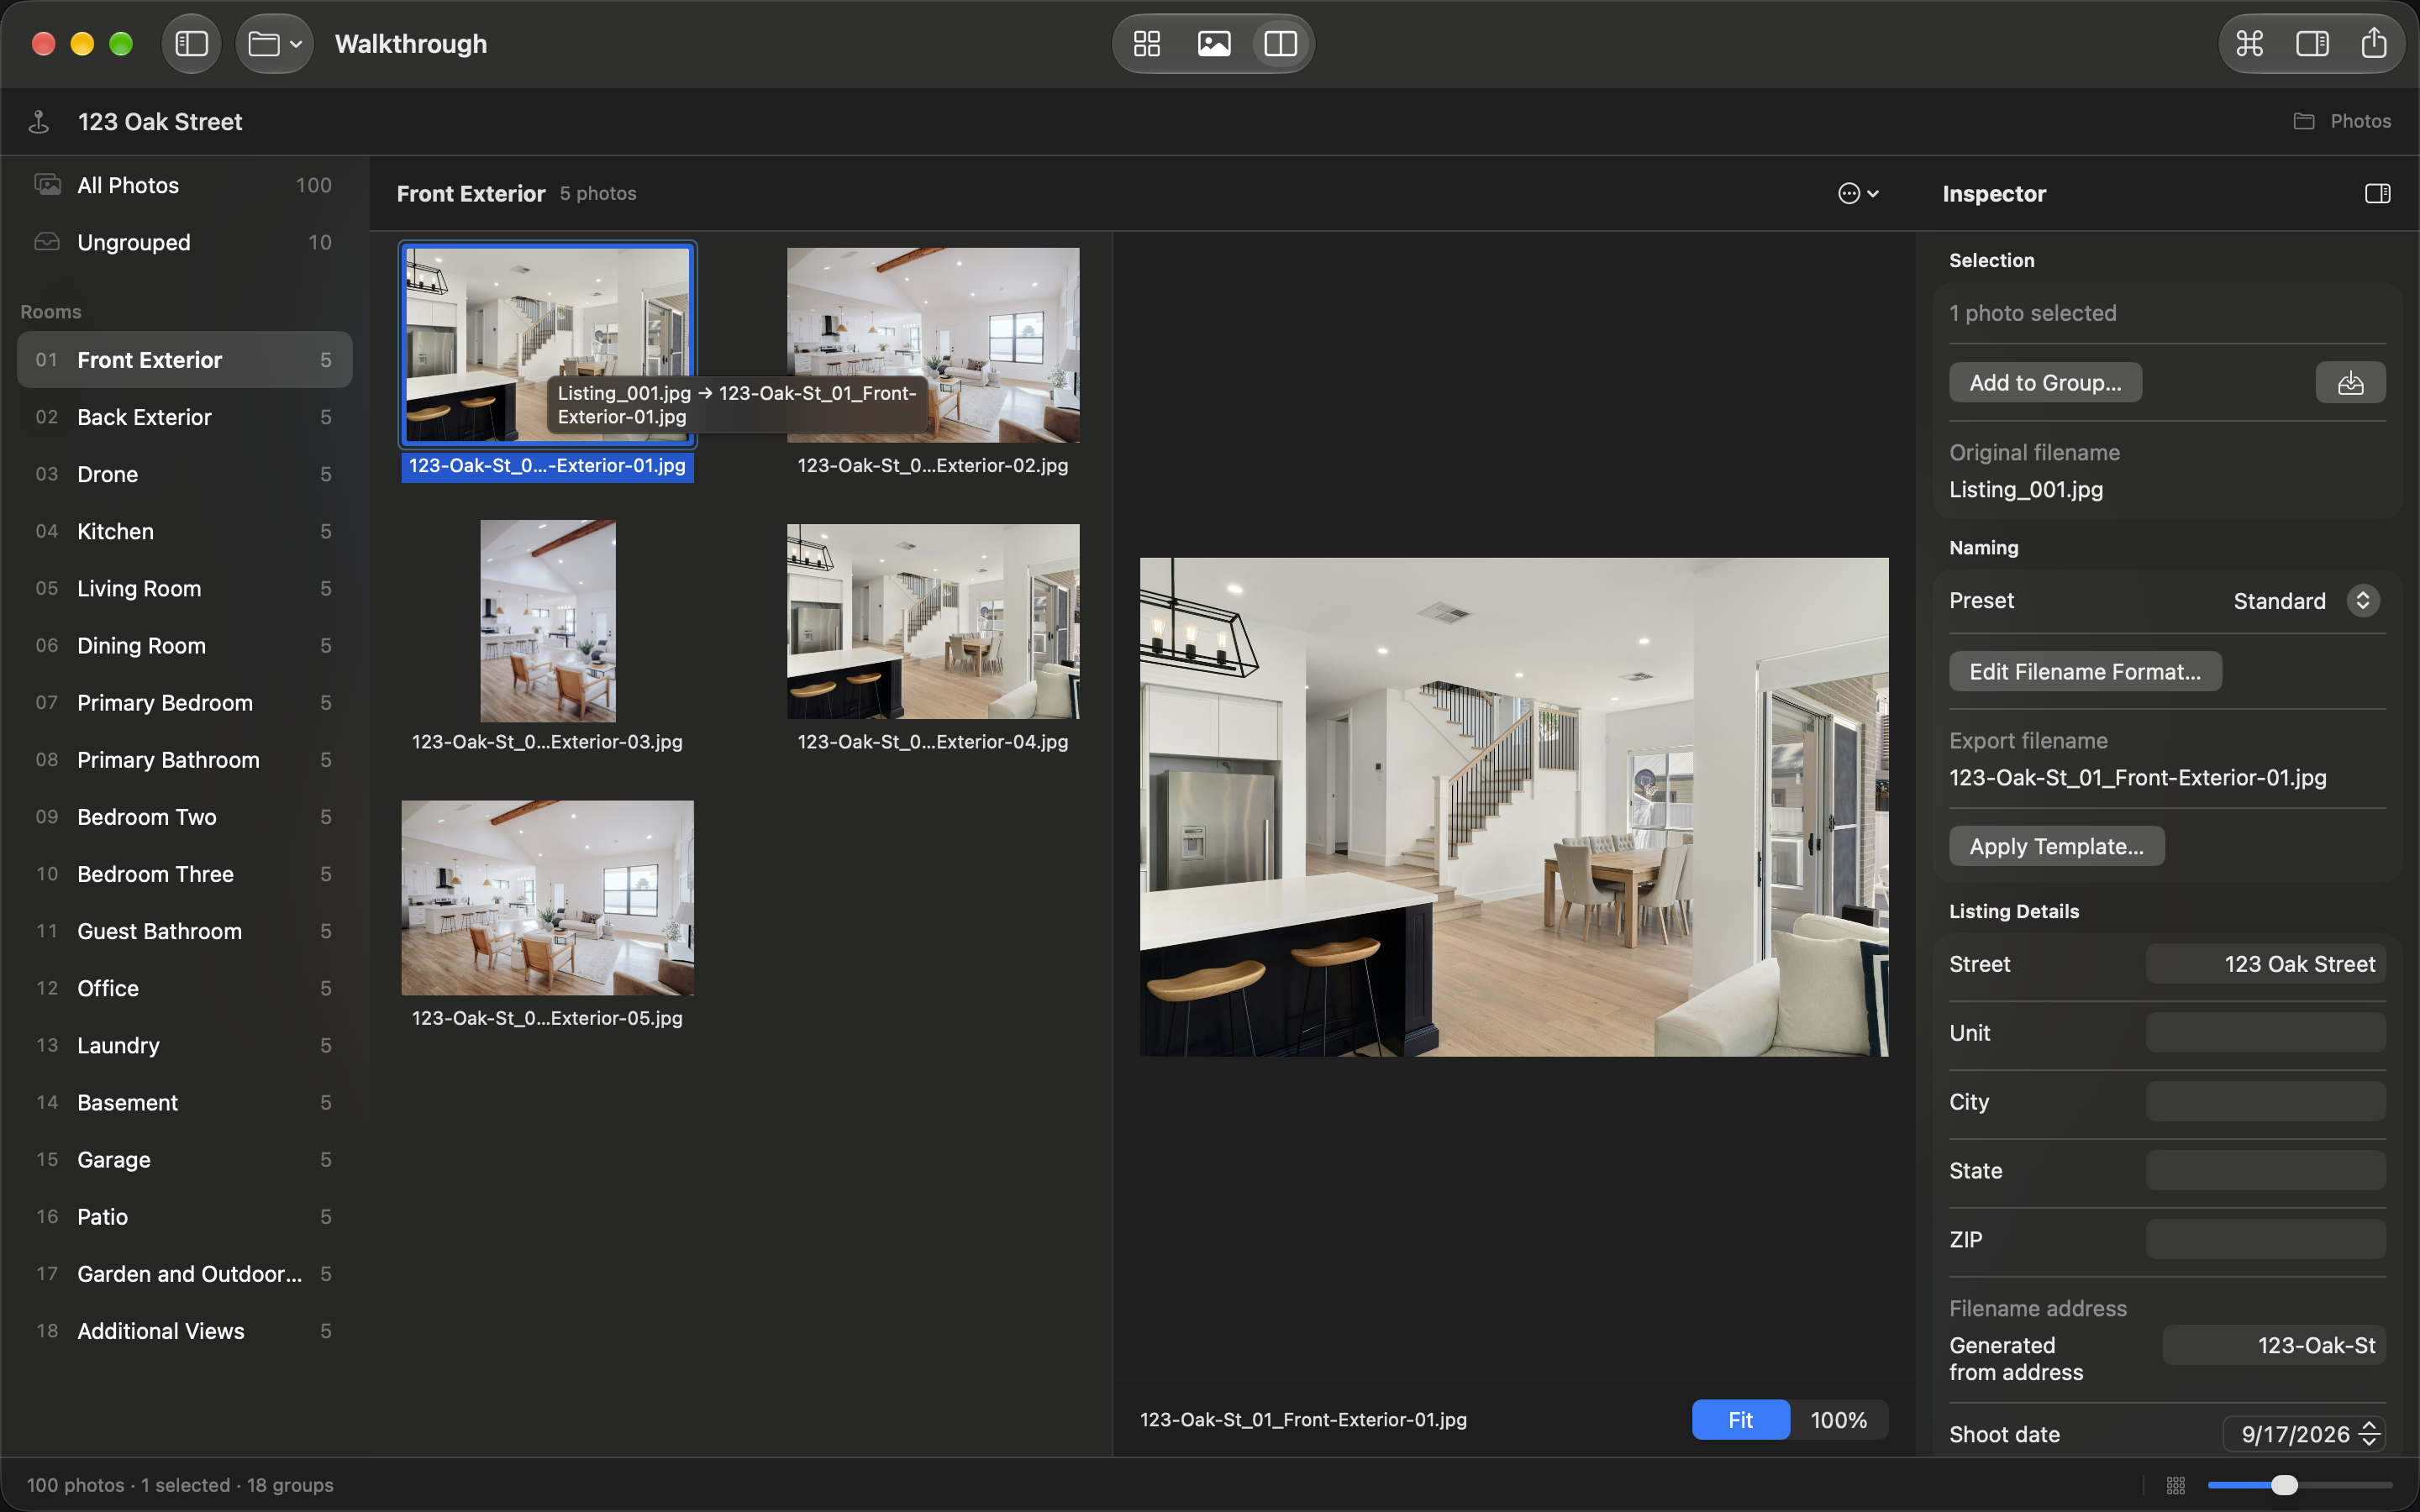
Choose Contact Sheet, Preview, or Split in the toolbar. Drag the native dividers to resize panes. Rooms and Inspector buttons show or hide the side panes; a pane may collapse at smaller widths to preserve space for photos. The inspector contains selection actions, original and export filenames, naming presets, templates, and listing details.
Enter the listing address, select photos, and press G to choose a group or create one. Command-click adds or removes individual photos; Shift-click selects a range. Drag photos onto a sidebar room to assign them, or onto Ungrouped to remove their grouping.
Drag rooms in the sidebar, use their context menu, or press ⇧G to arrange the delivery order. In the order editor, Up/Down chooses a room, Option-Up/Down moves it, and P lets you enter a position. Apply Order updates the filename sequence. Grouping, group renaming, ordering, and preset/template application support Command-Z.
Find an action with Command-K
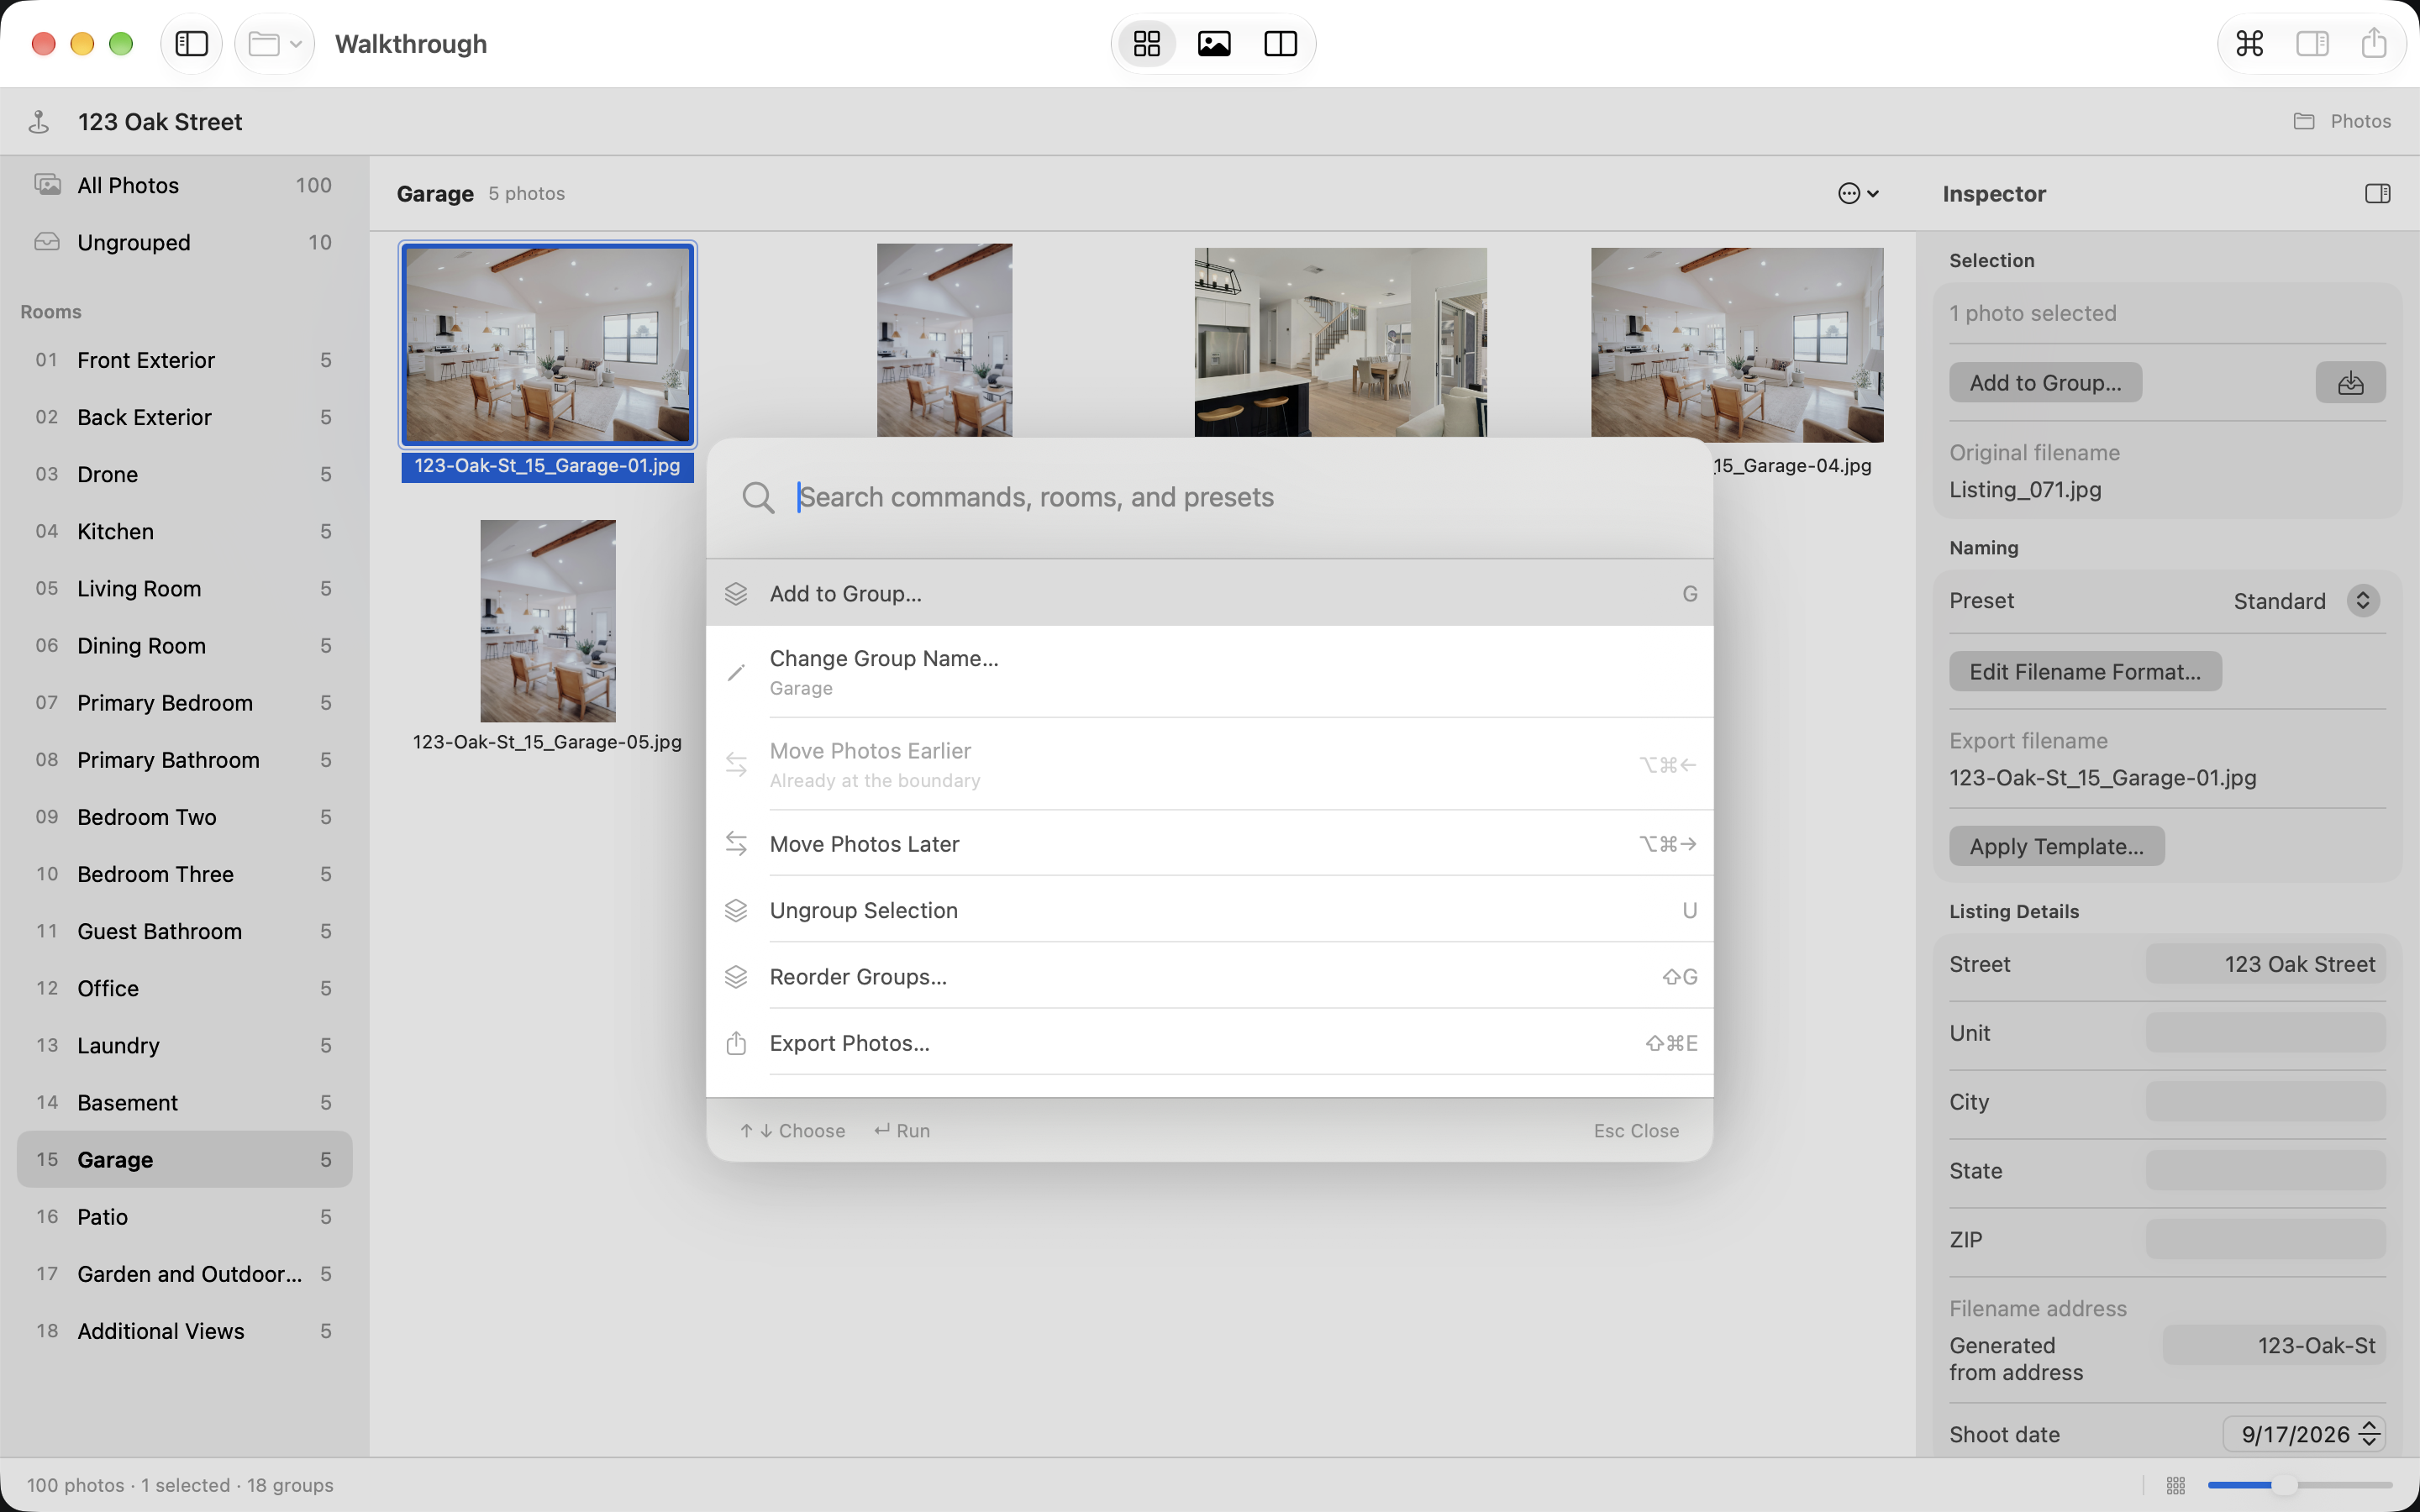
Press ⌘K, choose Commands in the toolbar, or use the menu command. The palette opens in the center of the window, with search ready for typing: search is case-insensitive and accepts partial and approximate matches. Results include actions, room groups, tags, naming presets, templates, and recent jobs.
Use Up/Down to choose a result and Return to run it, or click a row. Escape or clicking outside dismisses the palette without acting and returns you to your previous focus. Unavailable actions explain what is missing, such as a selection.
Go to Kitchen selects Kitchen in the sidebar and shows only that room in Contact Sheet. Add selected photos to Kitchen changes the selected photos’ group. These are separate actions. Export opens the review dialog; it does not immediately write files. Recent jobs reopen through the same restore behavior as the Open menu.
Search for actions and saved destinations, rather than individual photo filenames. The palette does not interpret requests with AI.
Change a group name from the palette
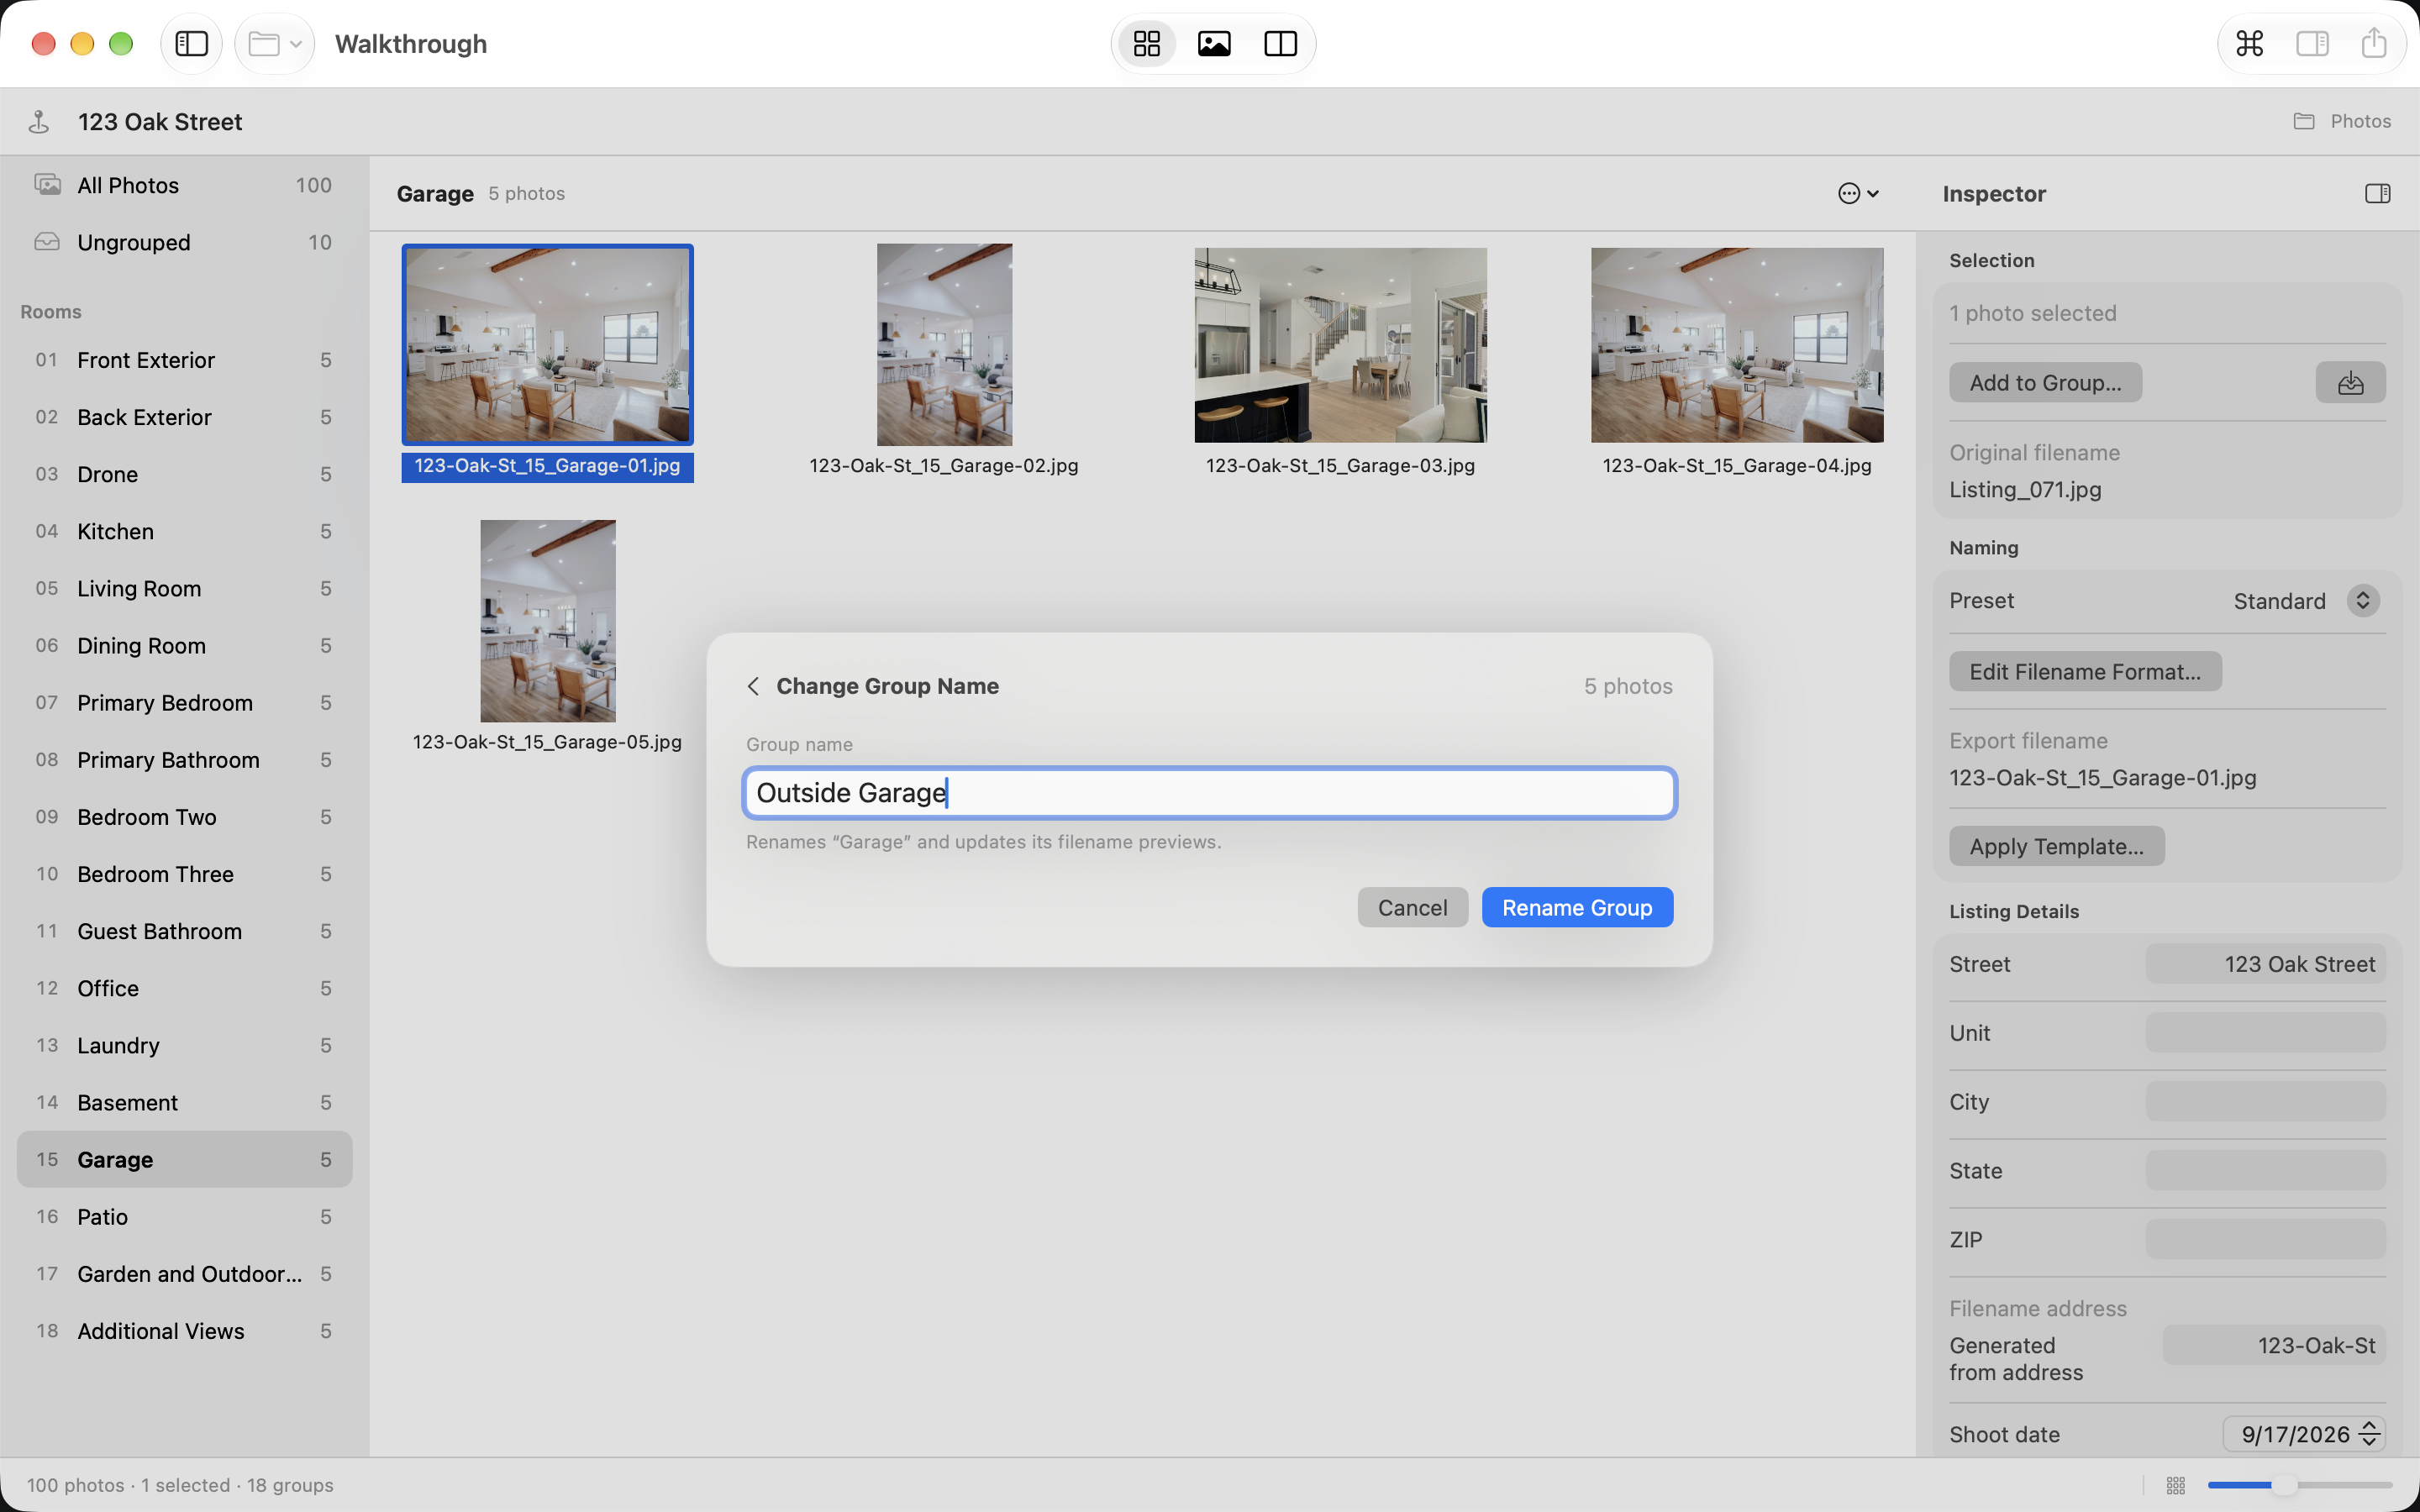
- Select a photo in the group you want to rename, or select the room in the sidebar.
- Press ⌘K and type change group name or rename group.
- Choose Change Group Name. The current name is filled in.
- Type the new name and press Return or choose Rename Group.
For example, select a Garage photo, open the command, and enter Outside Garage. The room label and filename previews update together. Photos keep their order and stay in that group. The files on disk change when you export.
Escape or Cancel leaves the name unchanged; Command-Z undoes a completed rename. If your selection spans more than one group, select photos from one group first. Double-clicking a room name or choosing Rename Room from its context menu also works. This changes the current job’s group name, not the reusable tag in Settings.
Keyboard reference
⌘ is Command, ⌥ is Option, and ⇧ is Shift. Photo shortcuts apply when the workspace owns focus. They pause while you edit text, use focused controls, or work in a dialog. Command-A keeps its normal Select All behavior in text fields.
| Keys | Action |
|---|---|
| ⌘K | Open command palette |
| ⌘O | Open a photo folder |
| ⌘A / ⇧⌘A | Select all photos in the current room or scope / show and select all ungrouped photos |
| G / U | Choose a group / return selected photos to Ungrouped |
| ⇧G | Open group-order editor |
| ⌥⌘← / ⌥⌘→ | Move selected photos earlier / later |
| Space / Z | Toggle Preview / toggle Fit and 100% zoom |
| T | Choose a template |
| ⌘1 … ⌘9 | Apply the first nine naming presets in library order |
| ⌥⌘1 / ⌥⌘2 / ⌥⌘3 | Contact Sheet / Preview / Split |
| ⌥⌘I | Toggle inspector |
| E / ⇧⌘E | Open export review |
| ⌘Z / ⇧⌘Z | Undo / redo workspace changes |
| ⌘, | Open Settings |
| ⌘S | Save Settings while Settings is active |
| ? | Open shortcut help |
Move Earlier/Later works when all selected photos belong to one group or to Ungrouped. Each selected run moves one position while keeping its internal order. Moves stop at section boundaries, never cross groups, and each successful invocation is one undo step. In All Photos, Select All also includes photos in collapsed groups. In one room, it selects only that room’s photos.
Settings and saving
Open Settings with ⌘, or search for Settings in the command palette. The sidebar has Tags, Presets, Templates, and General. Resize the window or scroll the editor to reach every option; the save area remains available.
Changes to the settings library stay in a draft until you choose Save Settings or press ⌘S. The footer shows unsaved changes. Invalid shortcuts prevent saving and show an explanation beside the affected field. Appearance and update preferences apply immediately and do not wait for Save Settings.
Tags: reusable room names
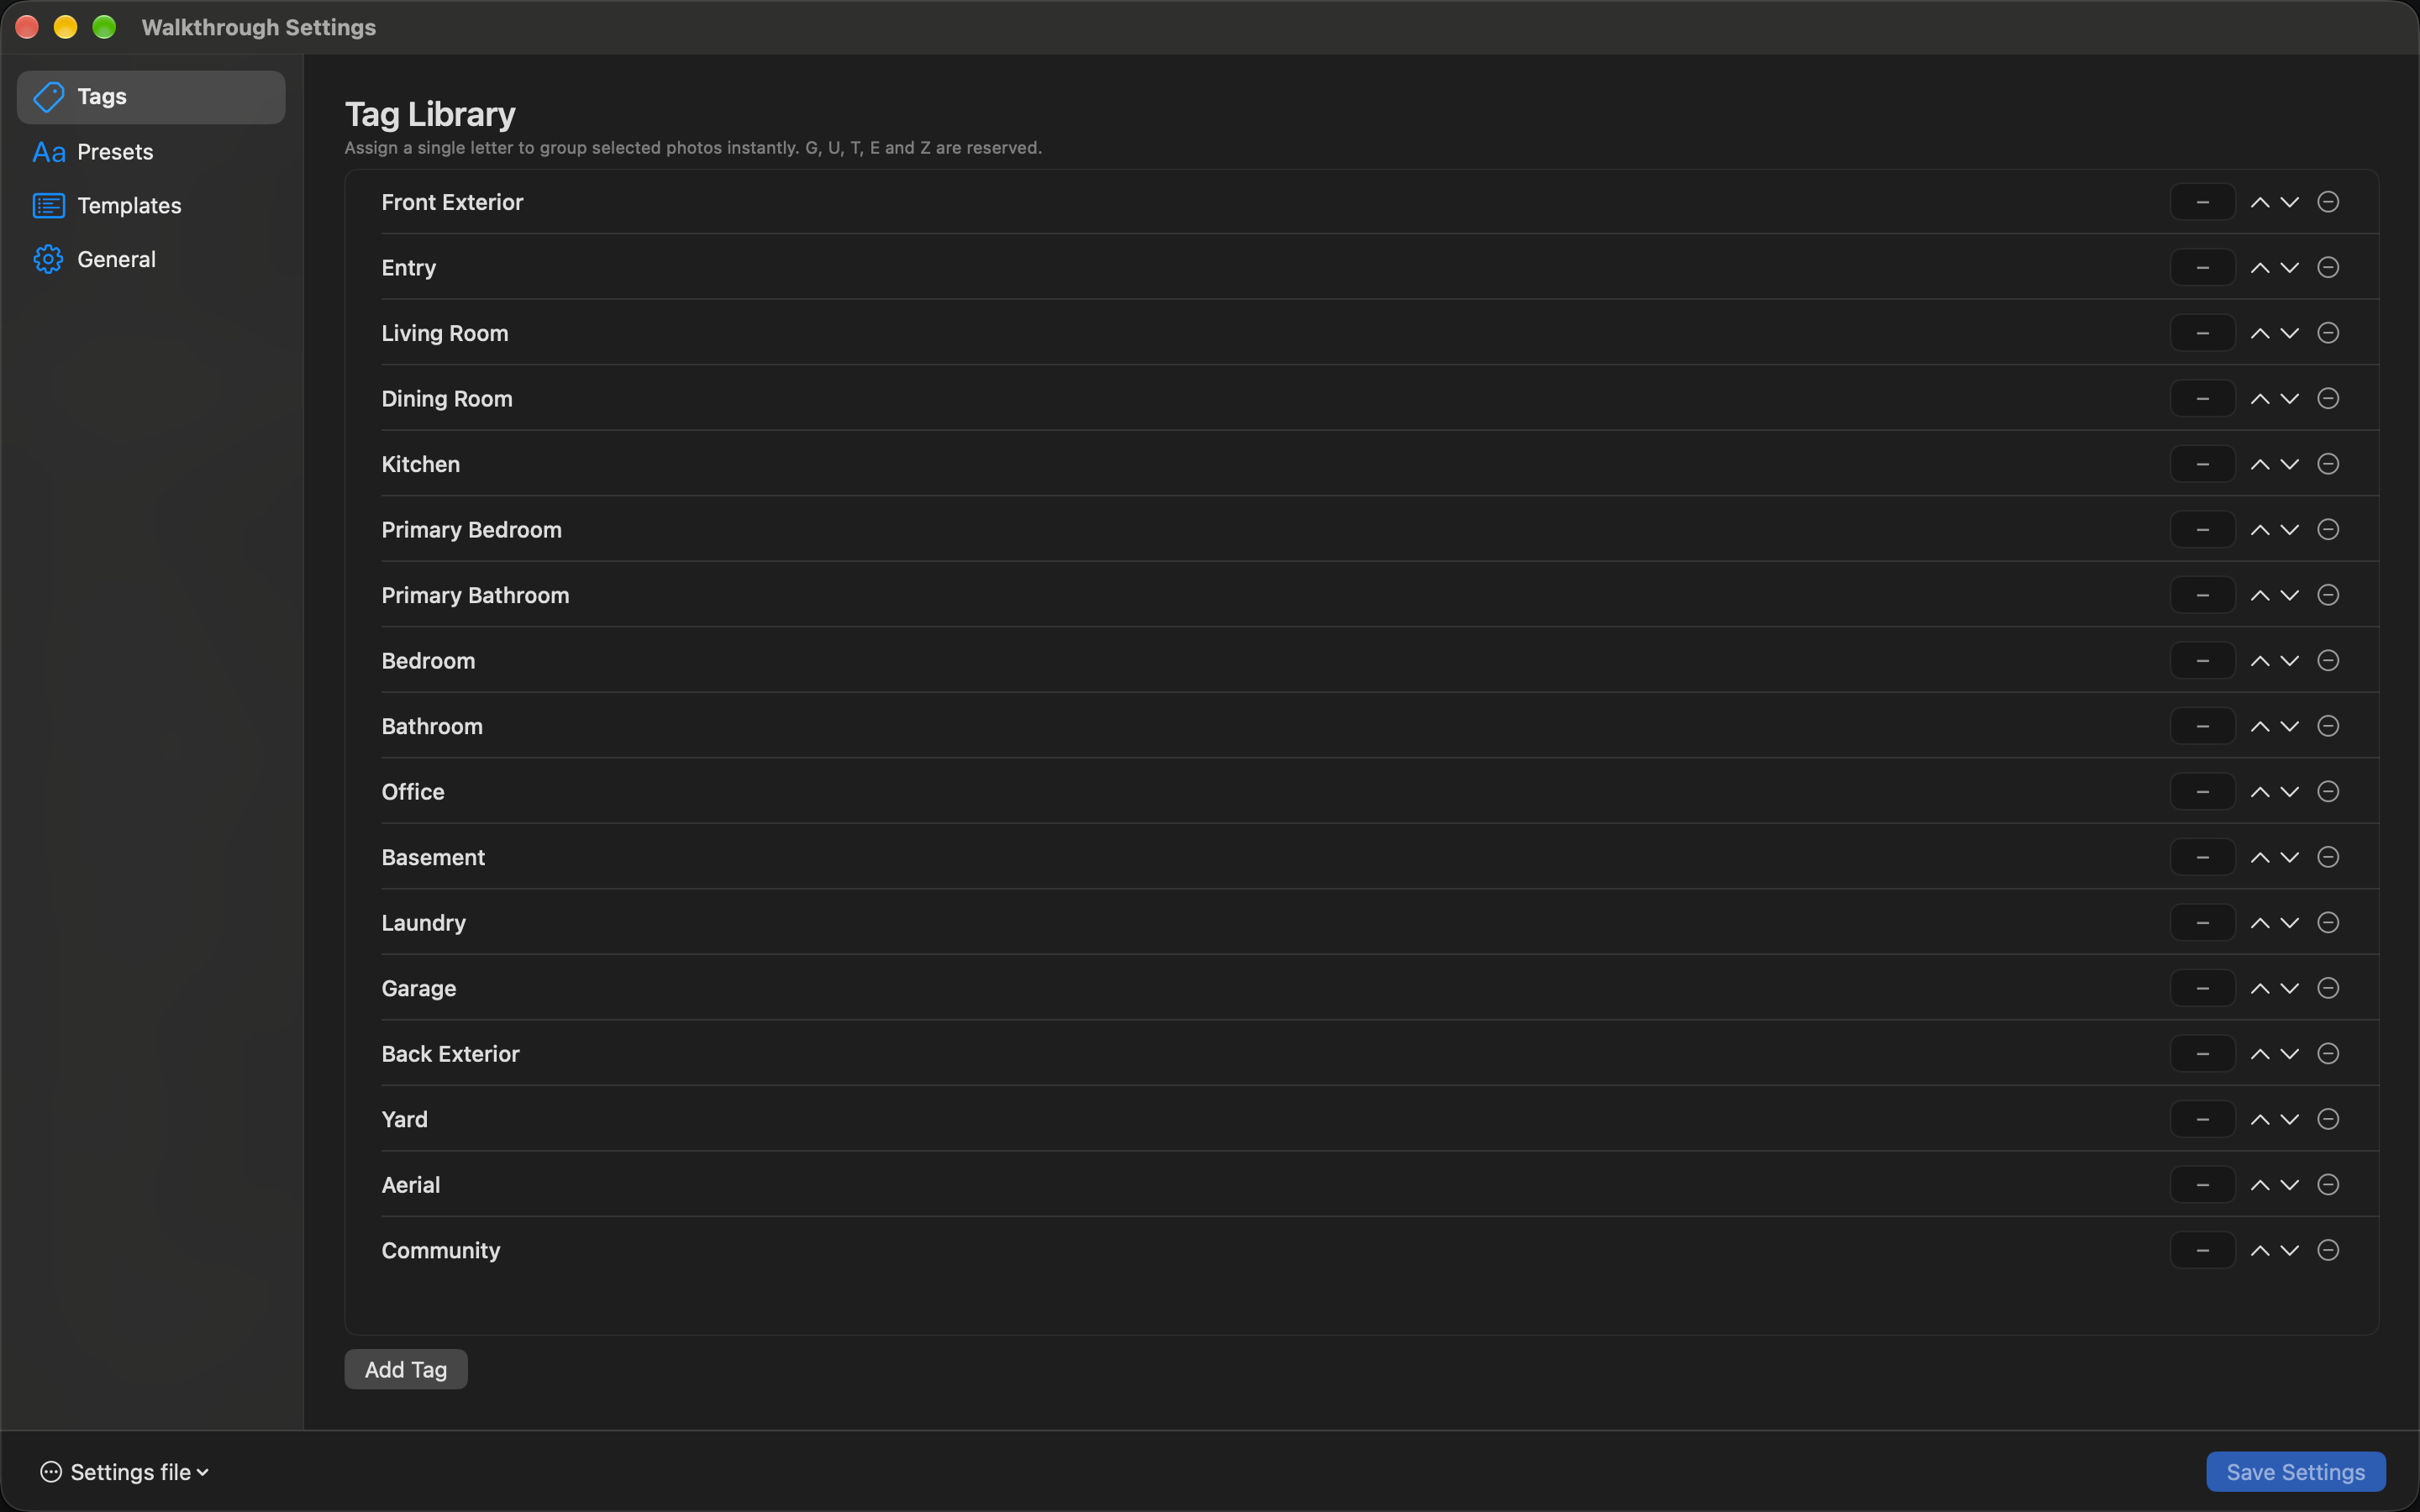
Add common room names such as Kitchen, Living Room, or Front Exterior. Edit each name, reorder the list with the arrow controls, or delete entries you no longer need. Tags give you reusable destinations for grouping and ingredients for templates.
Optionally enter one A–Z letter in the shortcut field. With photos selected in the workspace, that letter assigns them to the matching tag group, creating the group when needed. Tags do not receive shortcuts automatically.
G, U, T, E, and Z are reserved. Two tags cannot use the same letter. Remove or change a conflicting letter before saving; the inline error tells you why it is unavailable.
Presets: build a filename format
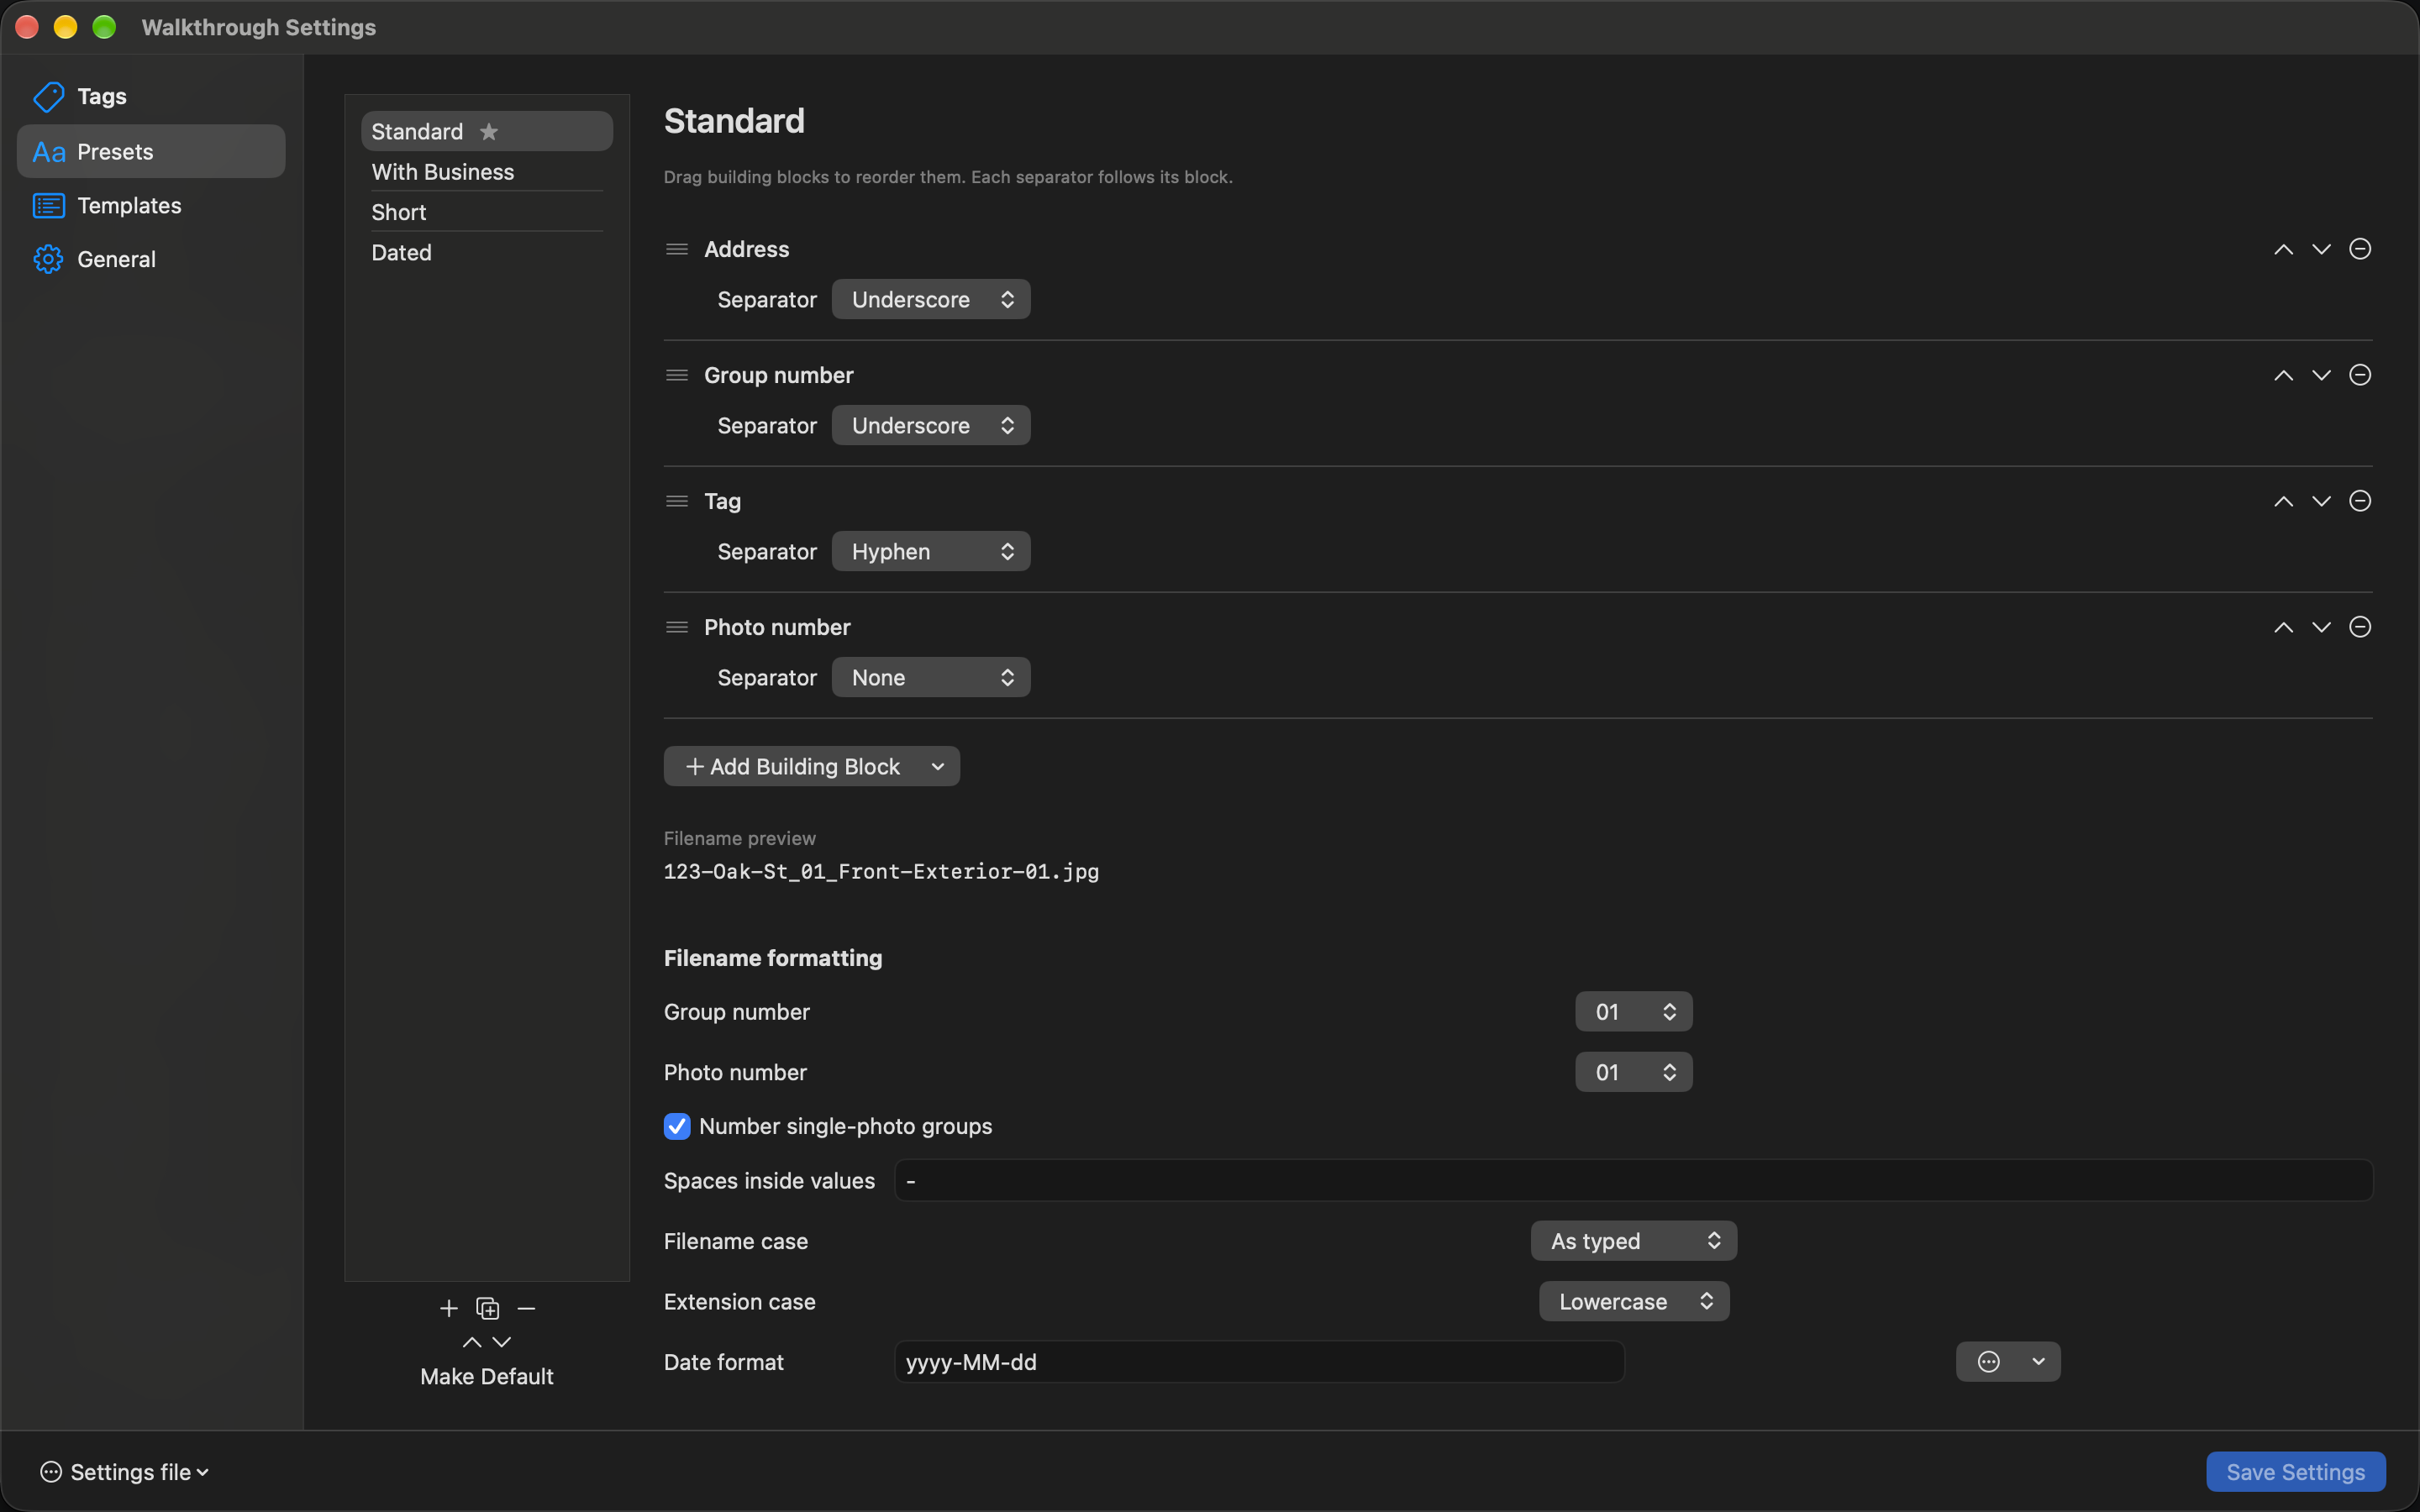
A naming preset defines the filename recipe. Select a preset to edit it; use the list controls to add, duplicate, delete, or reorder presets. At least one preset must remain. Make Default chooses the preset for new jobs. The first nine presets in list order are available with Command-1 through Command-9.
Each building block has its own row, with room for its value and separator. Drag rows or use the up/down controls to reorder them, remove unneeded blocks, and add new ones. Each block’s separator follows that block: underscore, hyphen, period, space, none, or custom text. Empty values omit their following separator too.
- Business
- Uses Filename name from General when supplied; otherwise uses Business name.
- Address, Unit, City, State, ZIP
- Use the listing information from the current job. Unit is a separate building block.
- Template
- Includes the applied template’s name.
- Shoot Date
- Uses the job’s shoot date and the preset’s date format.
- Group Number, Tag, Photo Number
- Include the group position, group name, and photo position within the group.
- Original
- Uses the original camera filename without its extension.
- Custom Text
- Adds a fixed label that you supply.
Number padding: choose 1, 01, or 001 independently for group and photo numbers. Enable numbering for single-photo groups if you want their filenames to include a photo number too.
Text formatting: choose the replacement for spaces, filename case (as typed, title, lower, or upper), and extension case (keep, lower, or upper). Date formats include yyyy-MM-dd, MM-dd-yy, and yyyyMMdd; use the preview to check a custom format.
The Standard pattern produces names such as 123-Oak-St_01_Entry-02.jpg. Leading zeros preserve numeric sequence when files are sorted by name. In the inspector, Edit Filename Format changes the job’s format; use Update Preset or Save as New when you want a reusable library preset.
Templates: repeat a delivery order
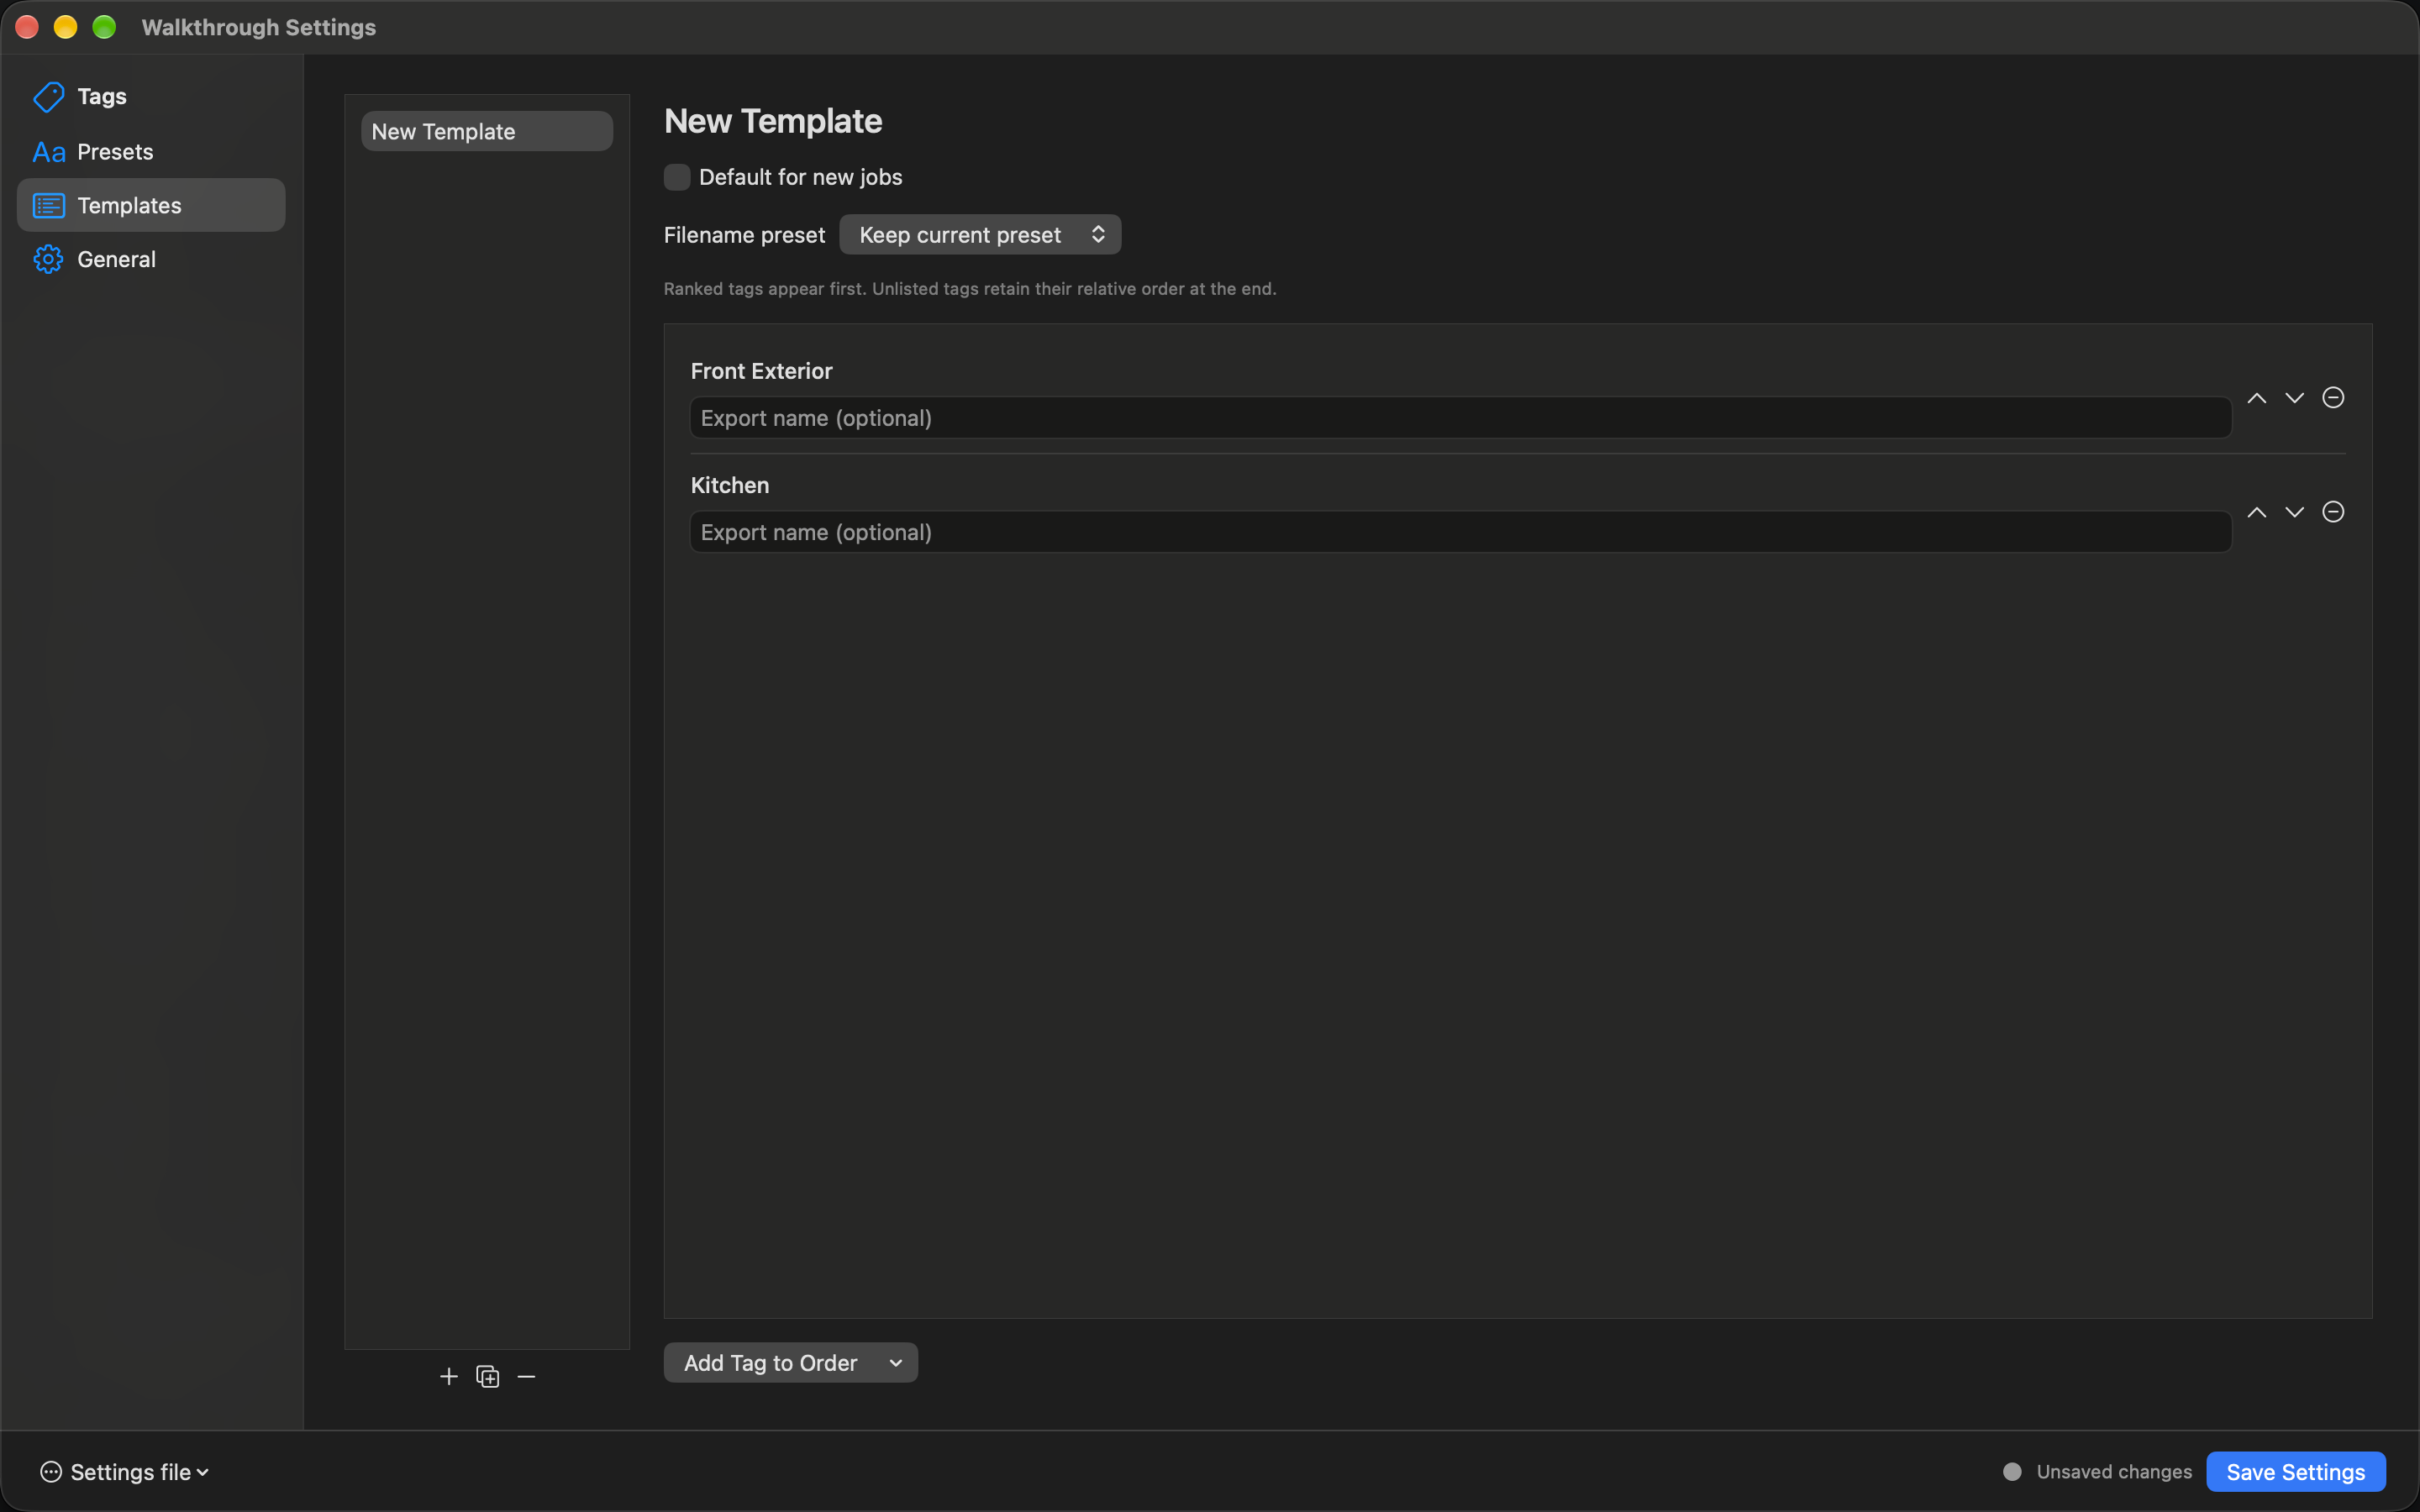
Templates combine an ordered set of tags with an optional naming preset. Add or duplicate a template, name it for a realtor or delivery workflow, and optionally make it the default for new jobs.
Choose a filename preset, or Keep current preset. Use Add Tag to Order, then arrange tags with the move controls or by dragging. An optional export-name override changes a tag’s output label for that template. Remove a tag from the order when it is no longer needed.
Groups with tags outside the template follow the listed tags in their existing order. A manually named group retains its manual name. Apply a template to the current job with T or through the command palette; applying a template is undoable.
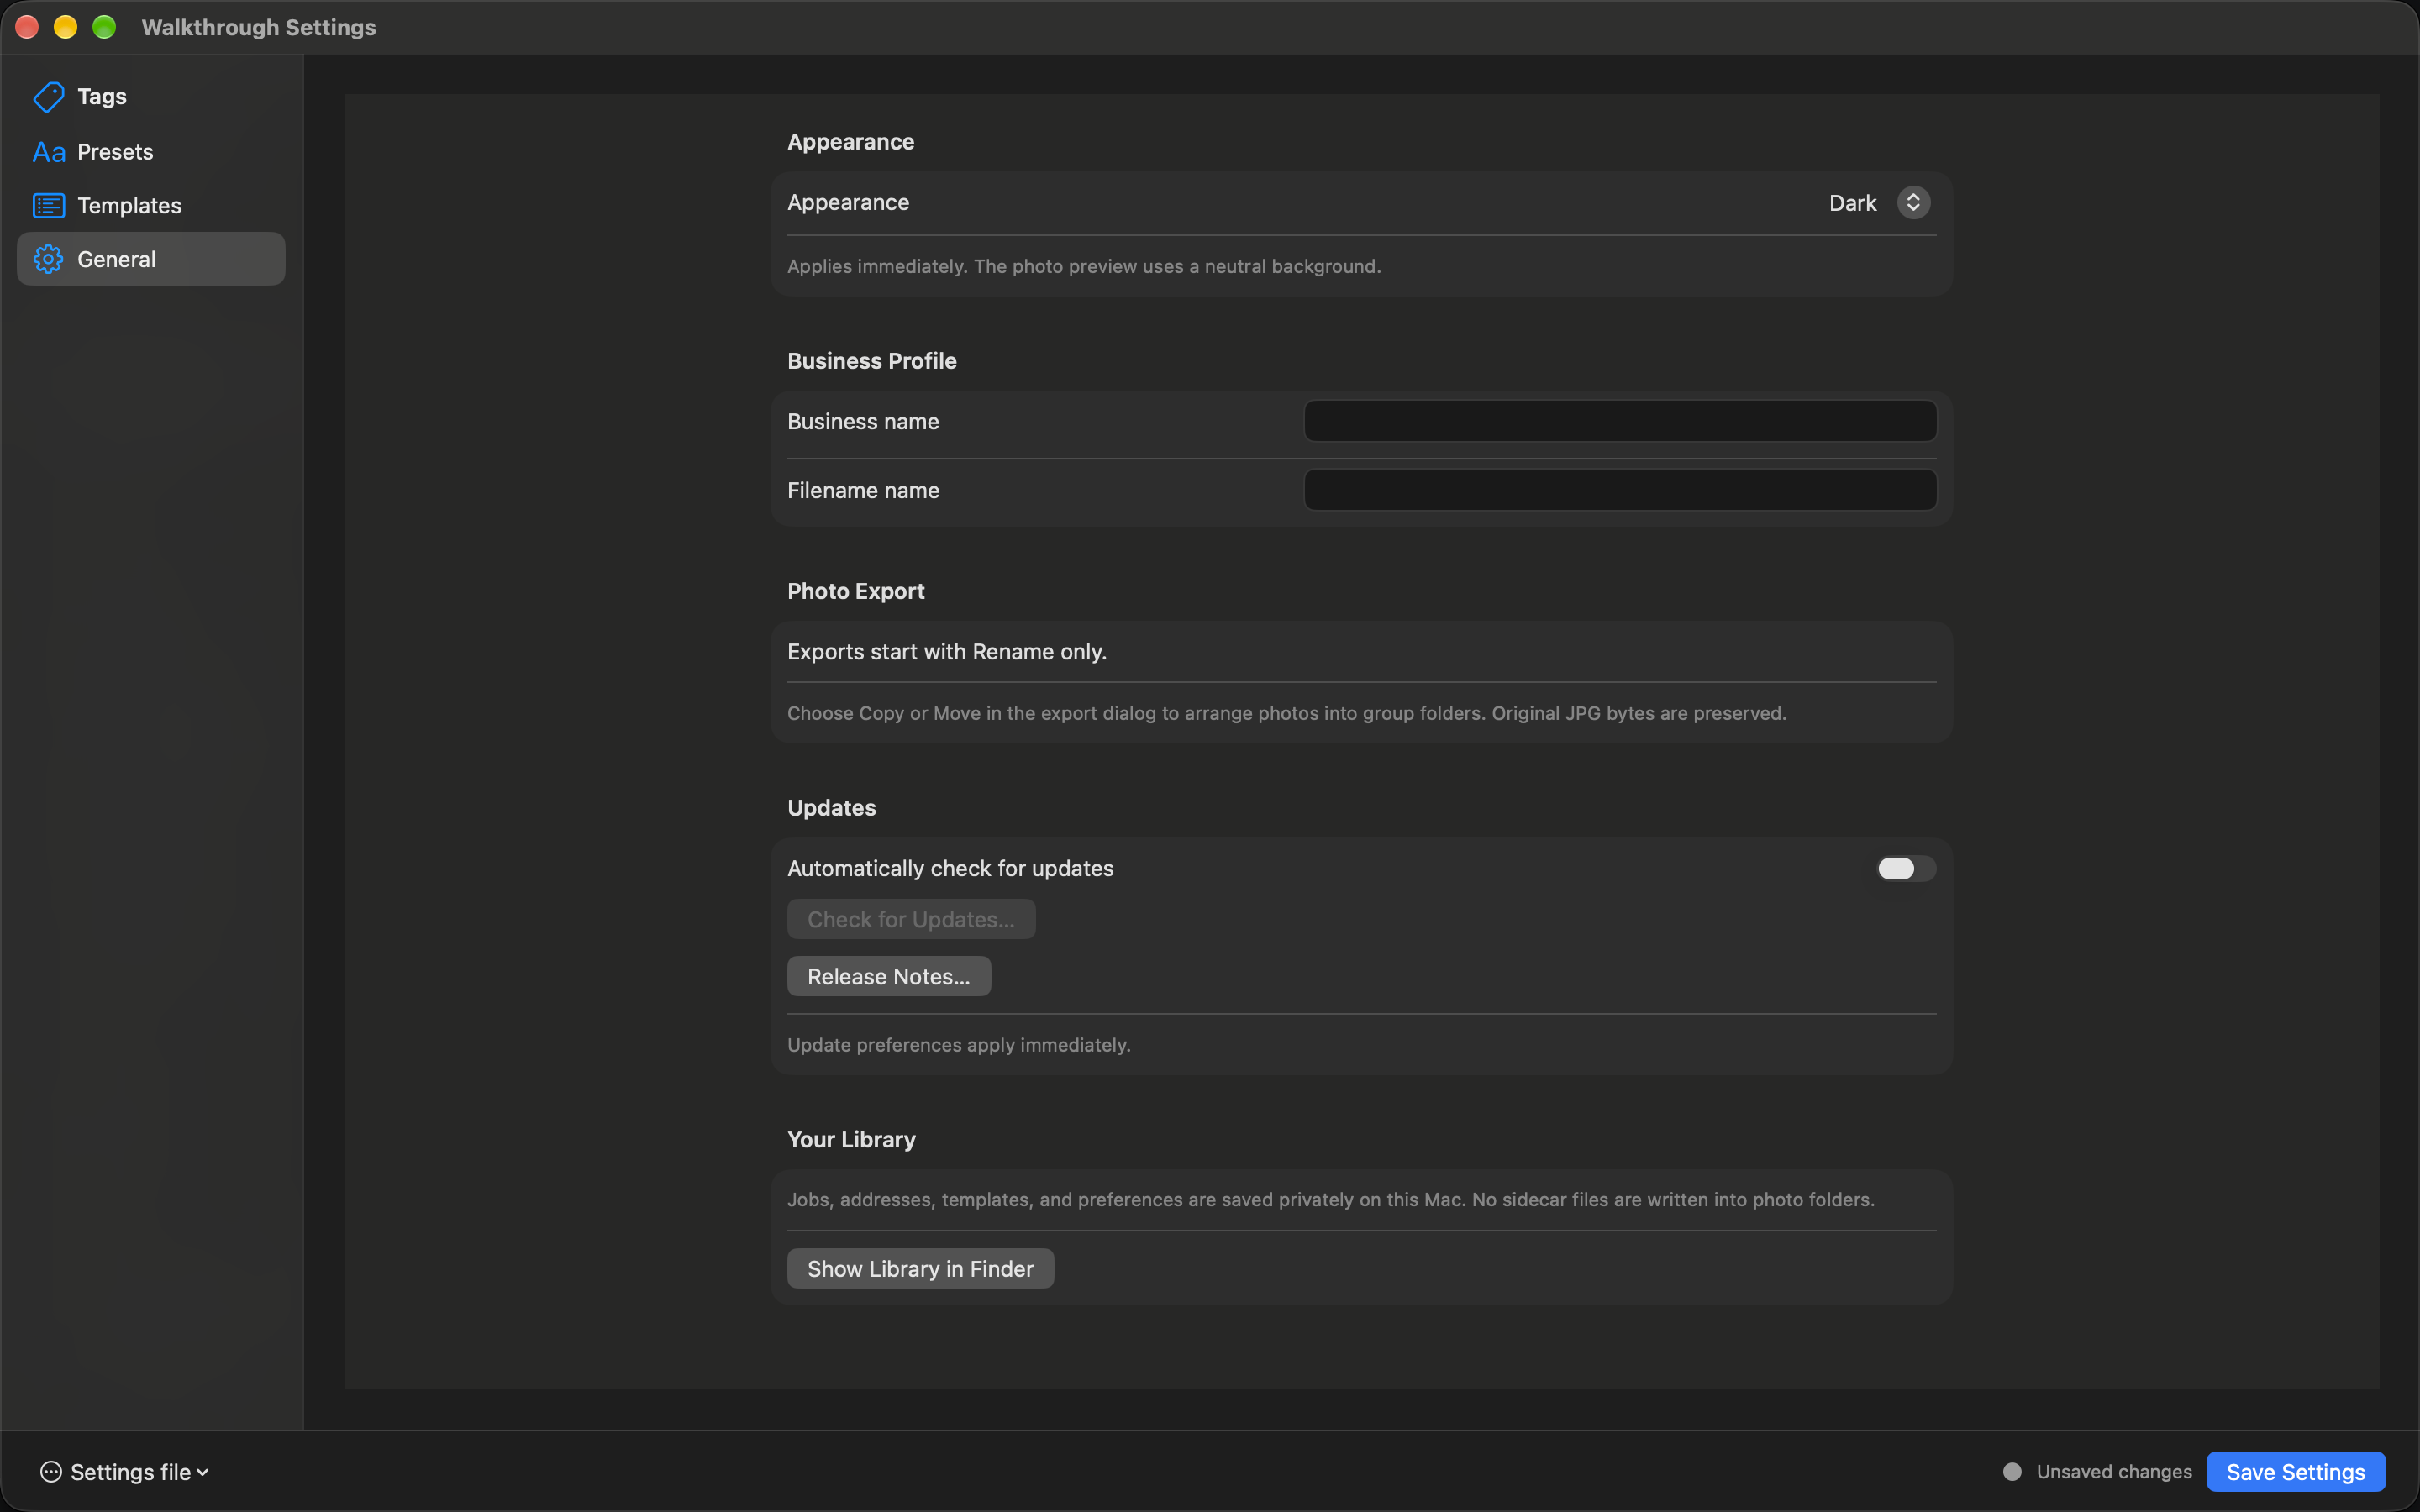
General: appearance, business, updates, and library
- Appearance
- Choose System, Light, or Dark. New installations use System; existing choices are preserved. This applies immediately. System follows your Mac’s appearance.
- Business
- Set your Business name and an optional Filename name. The shorter filename value is used by the Business naming block when it contains usable text; otherwise the business name is used. Save Settings commits these edits. Applying a preset or template and reopening a job uses your current saved business profile. If the Business block has no usable name, the filename preview explains where to add one.
- Photo Export
- Every export starts with Rename only. Choose Copy or Move in the export dialog; there is no default-copy preference to save.
- Updates
- Choose whether to check automatically, check manually, or open release notes. Update preferences apply immediately.
- Library
- Show Library in Finder opens the local app-data folder. Job history lives on this Mac; there are no sidecar job files or account requirements. Photos remain in the folders you choose.
Import and export your settings
Use the secondary menu in the Settings footer to Import Settings or Export Settings. A .listingnamersettings file carries your reusable configuration, not photographs or job history.
Export requires valid settings. Import validates the file and lets you choose Merge or Replace. Merge keeps unrelated library items and updates matching entries; Replace adopts the imported library. Confirming the import applies and saves that choice. Review the imported tags, presets, and templates afterward.
Export: rename, copy, or move
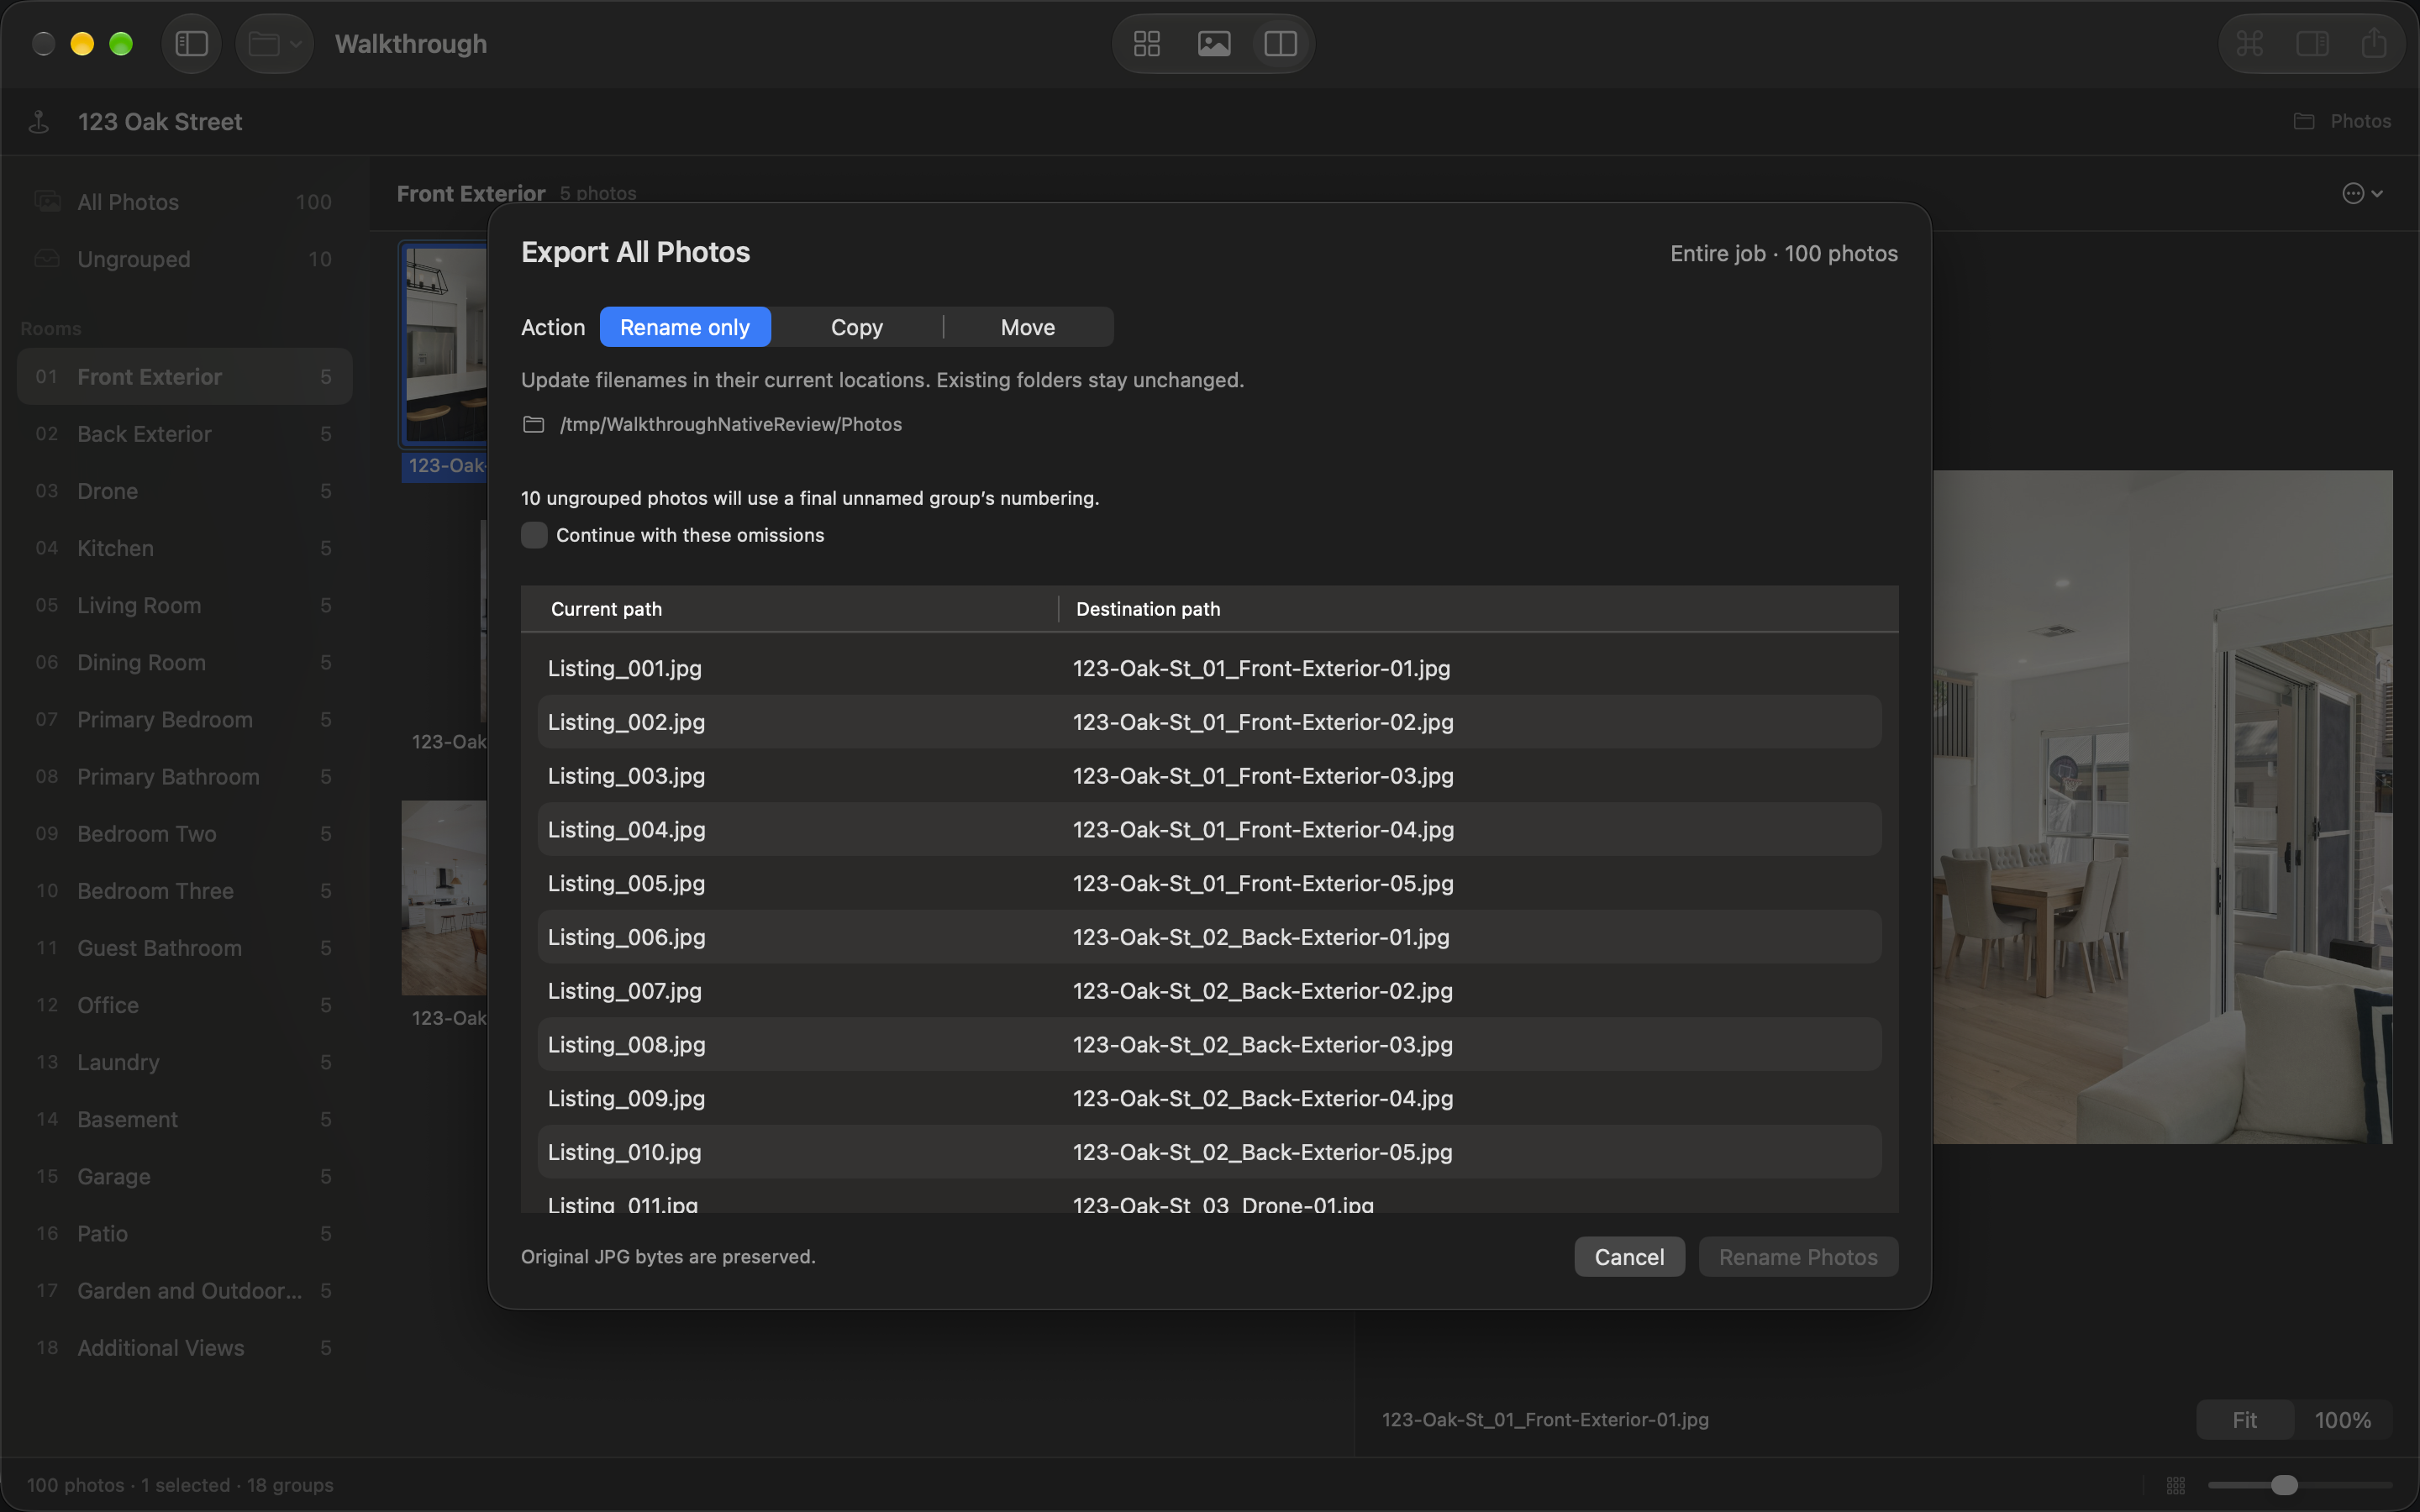
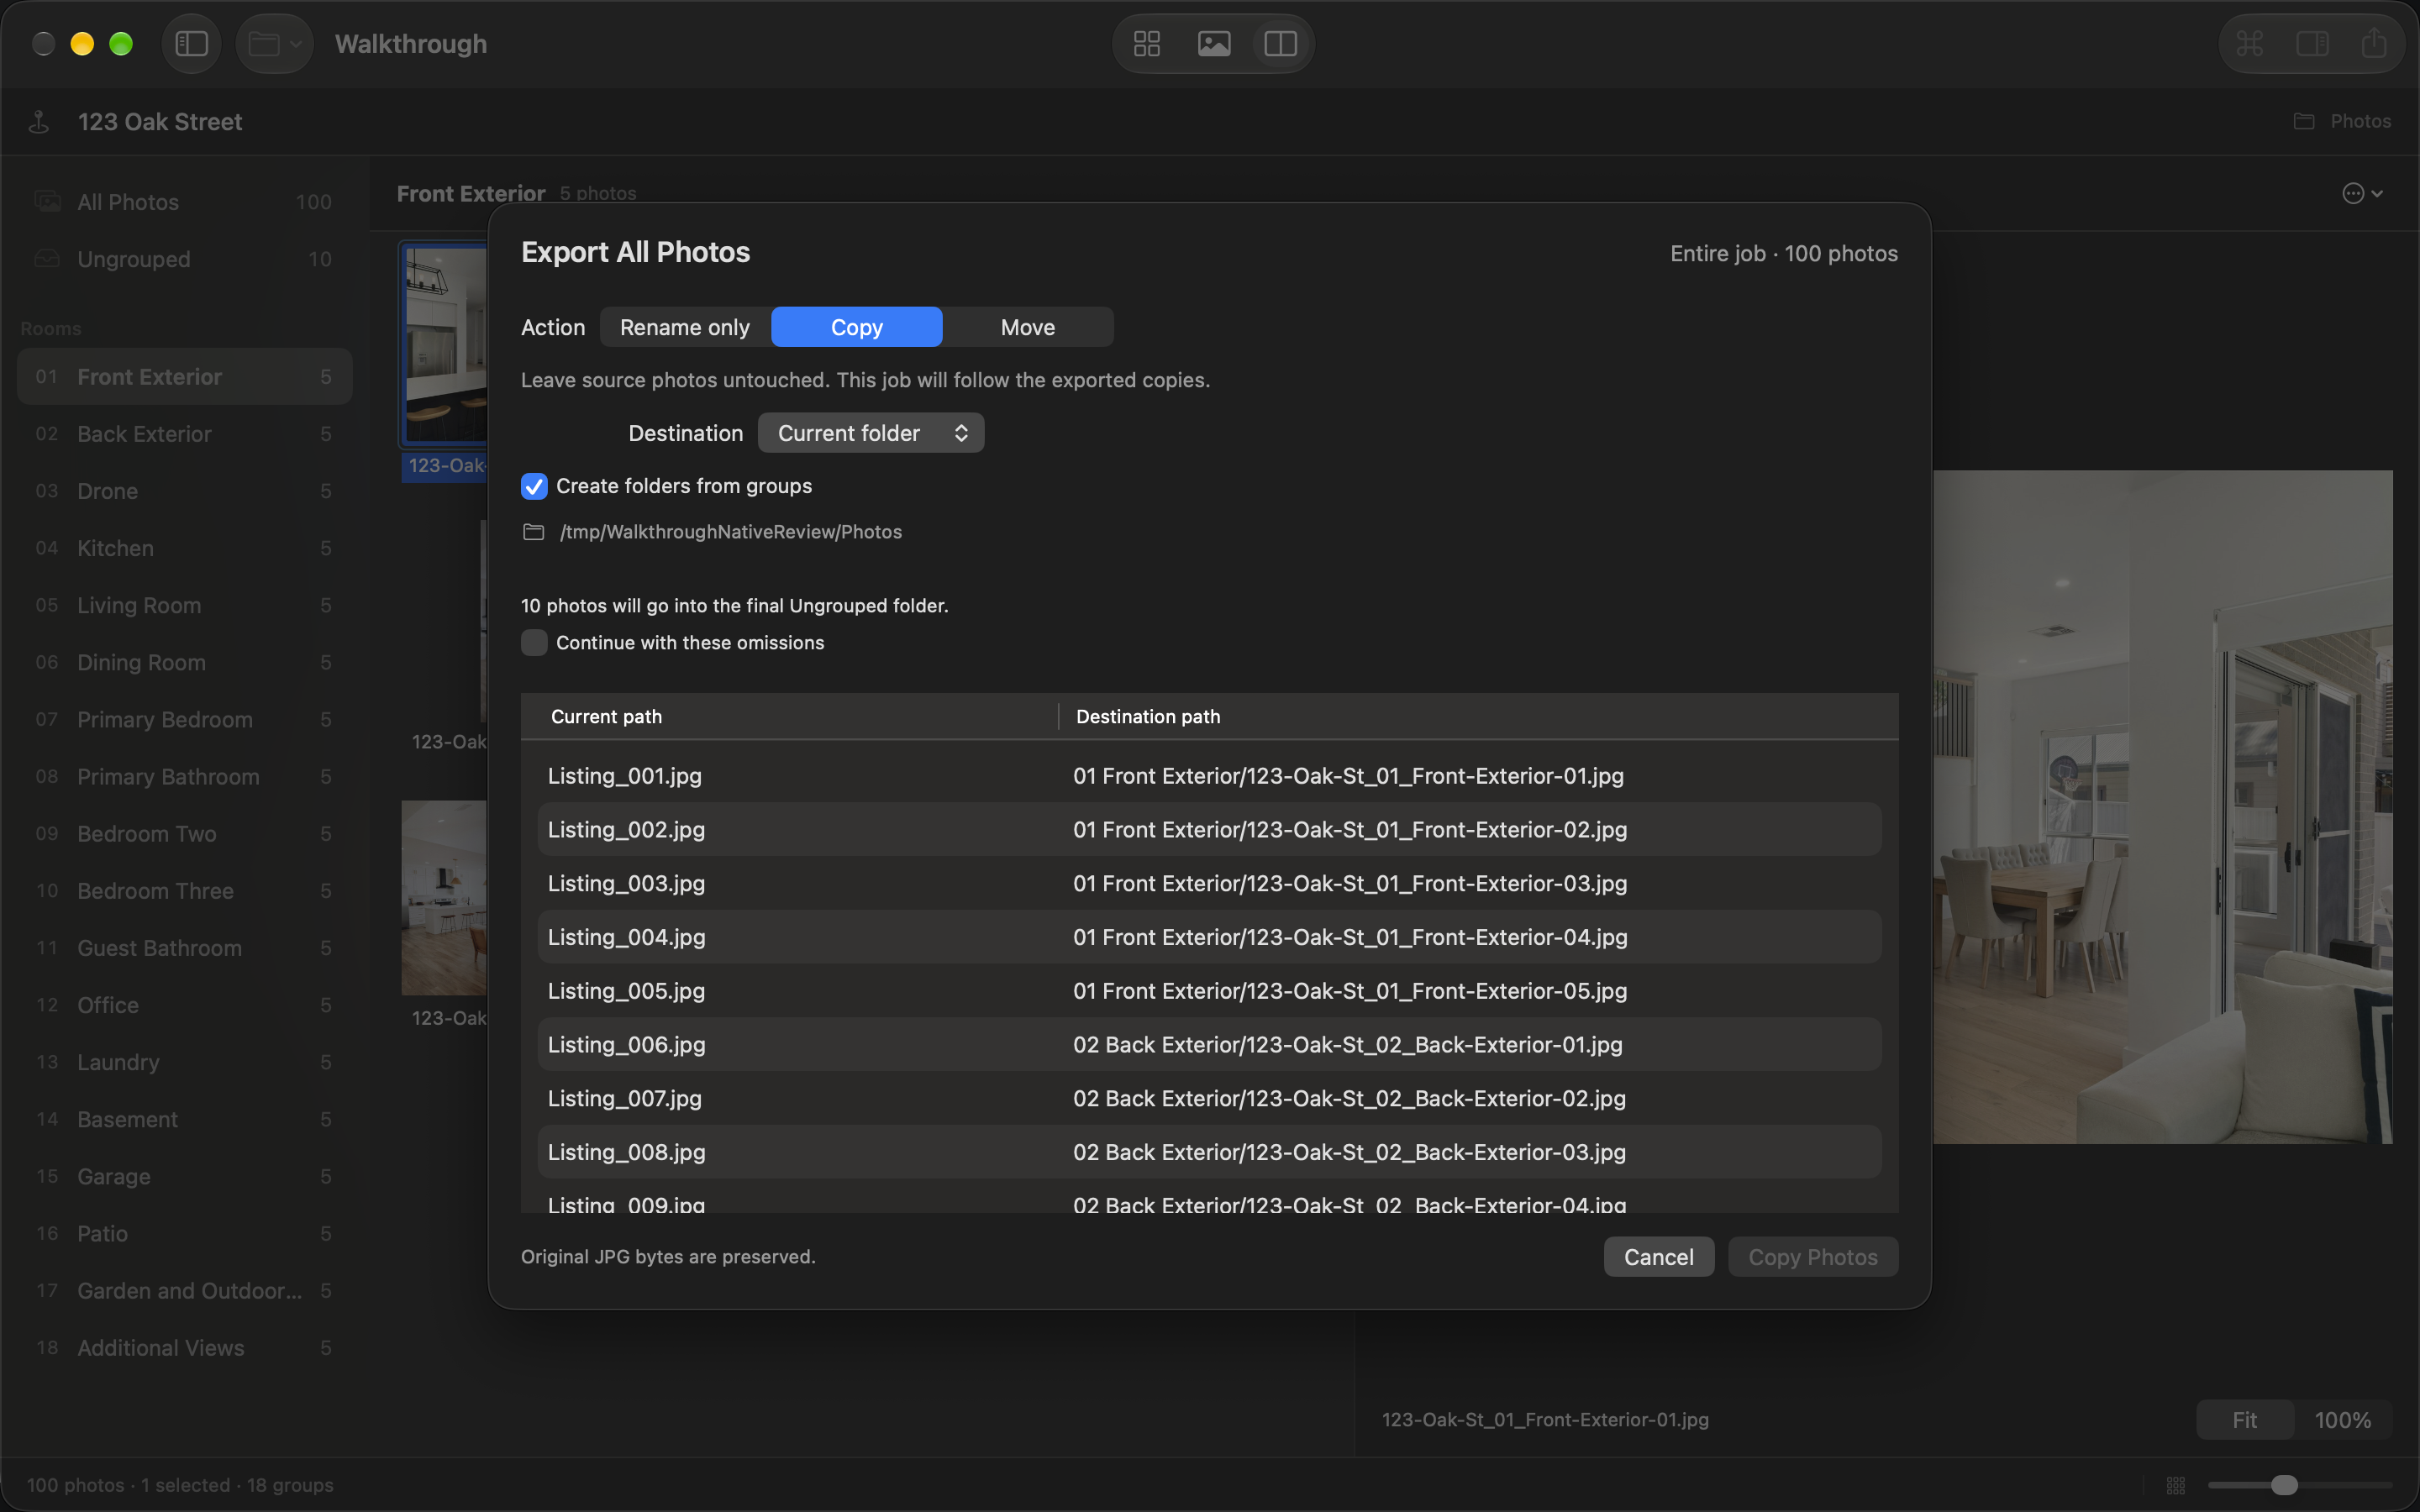
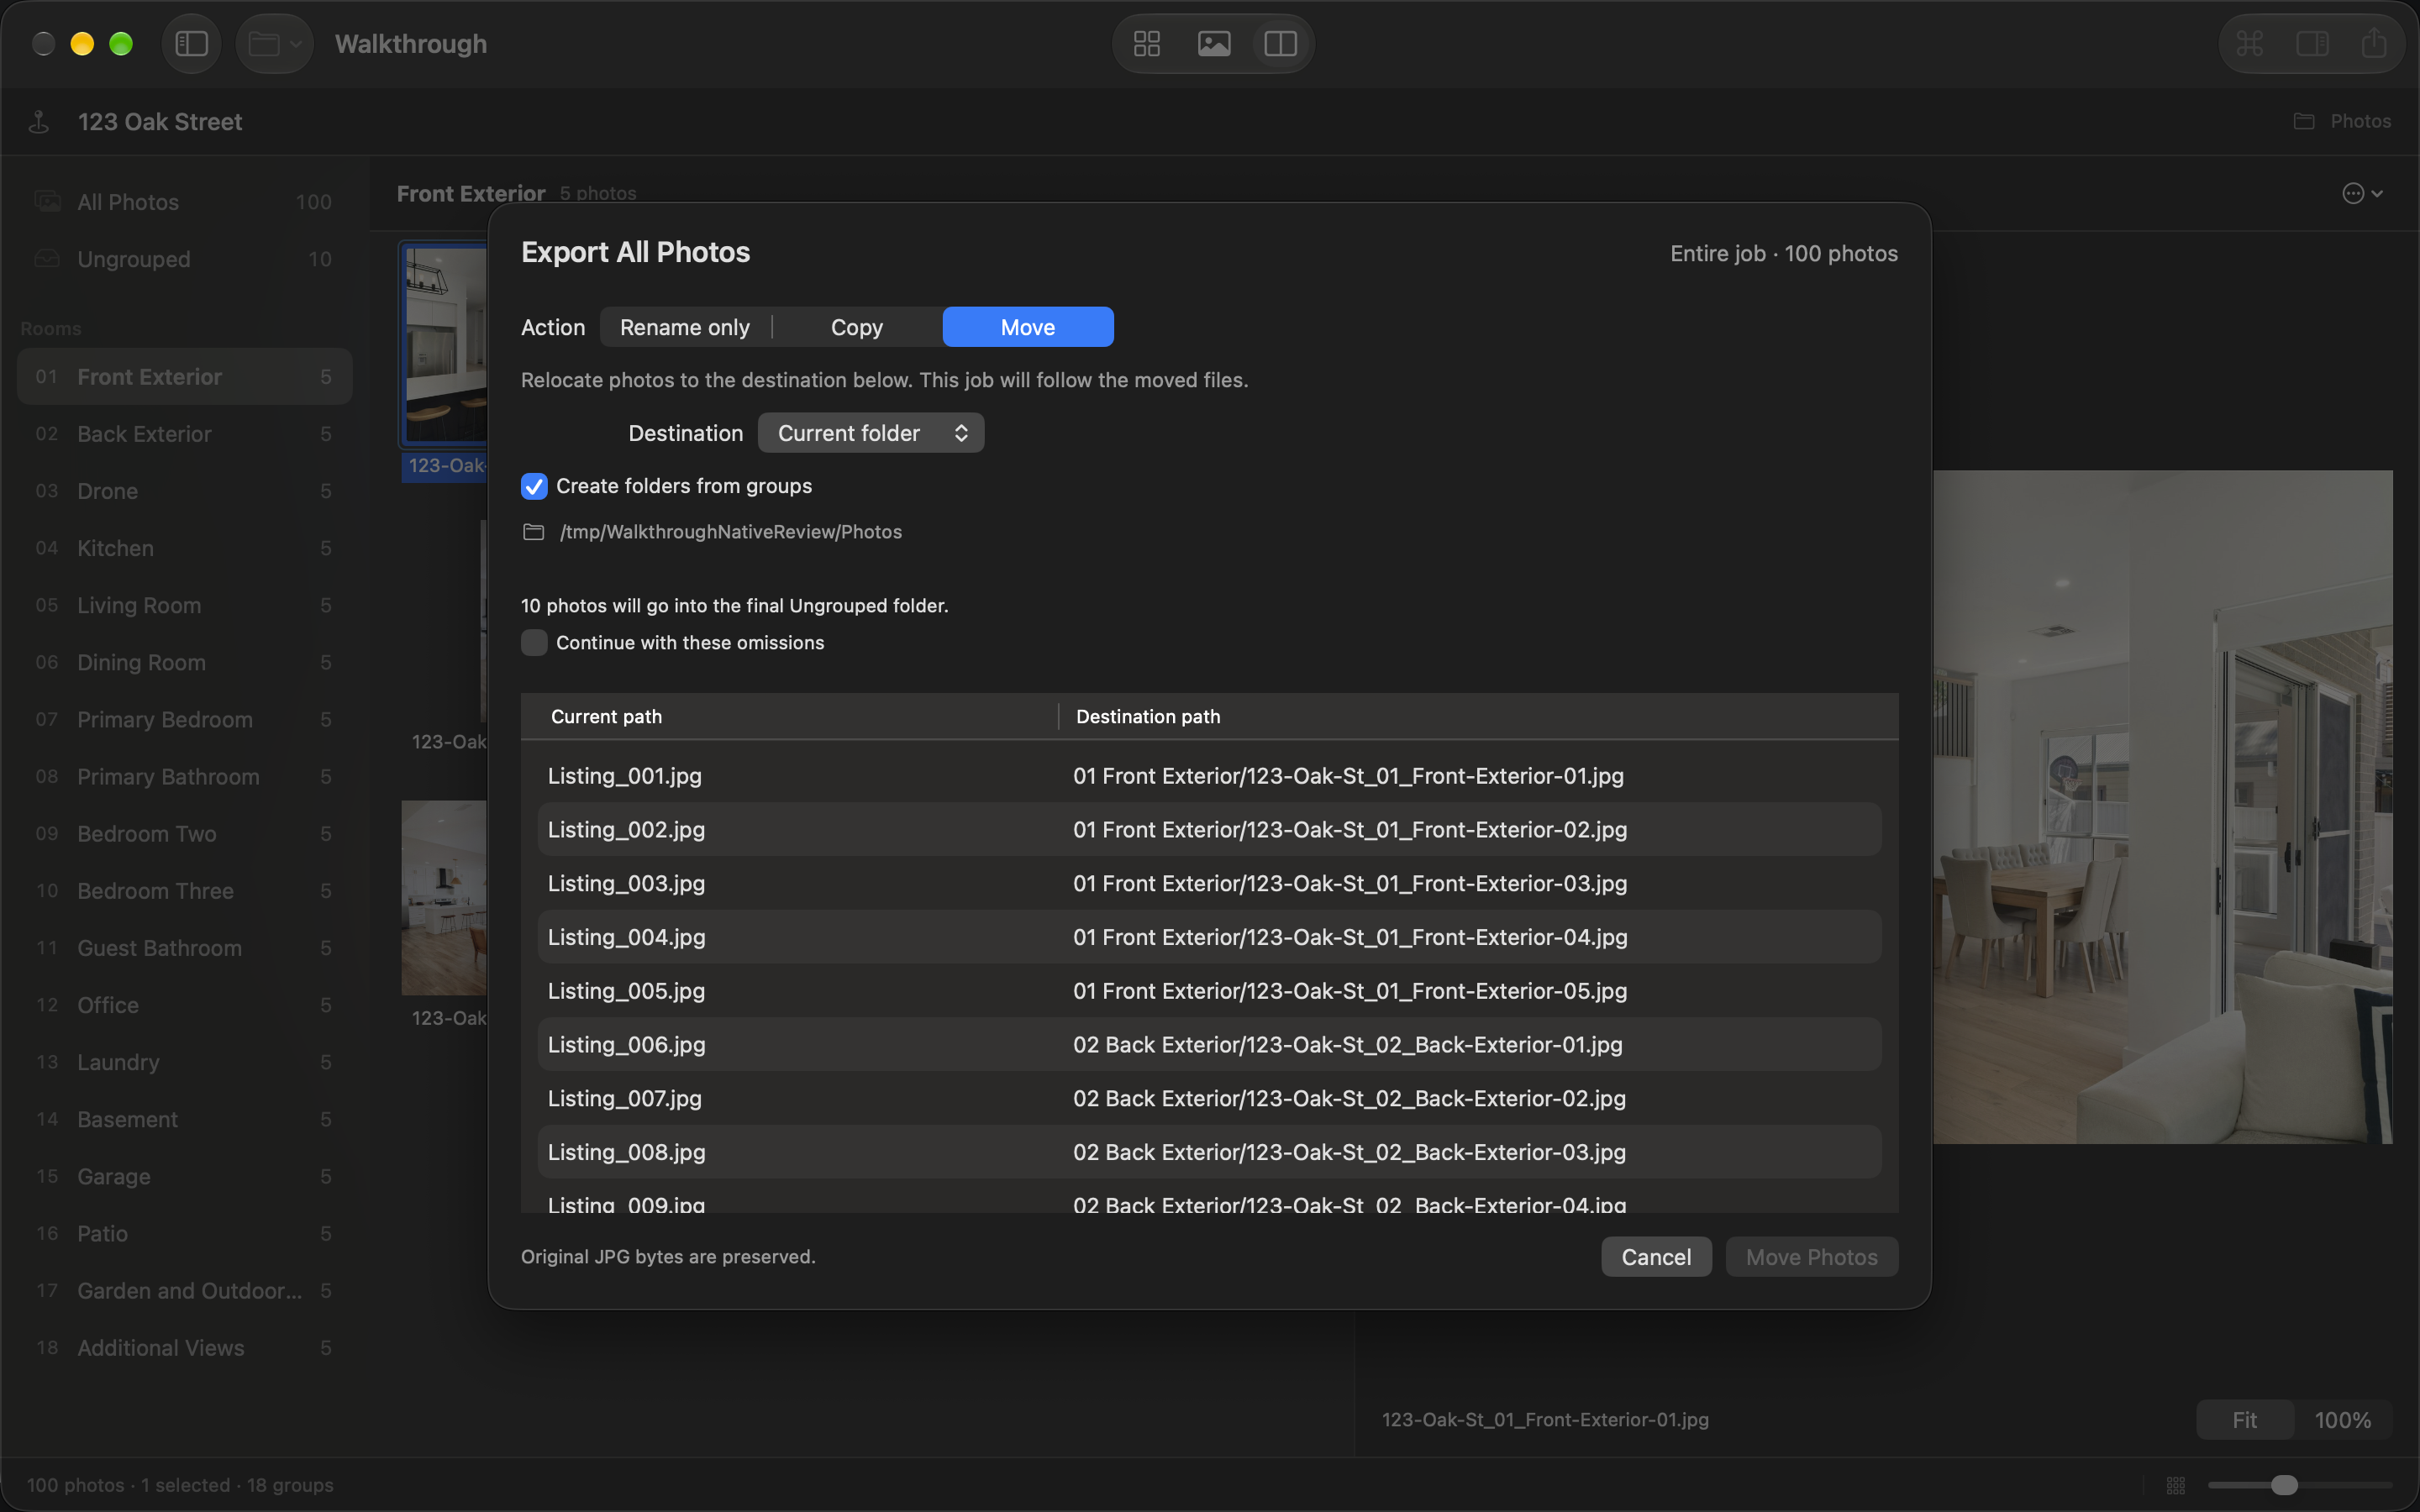
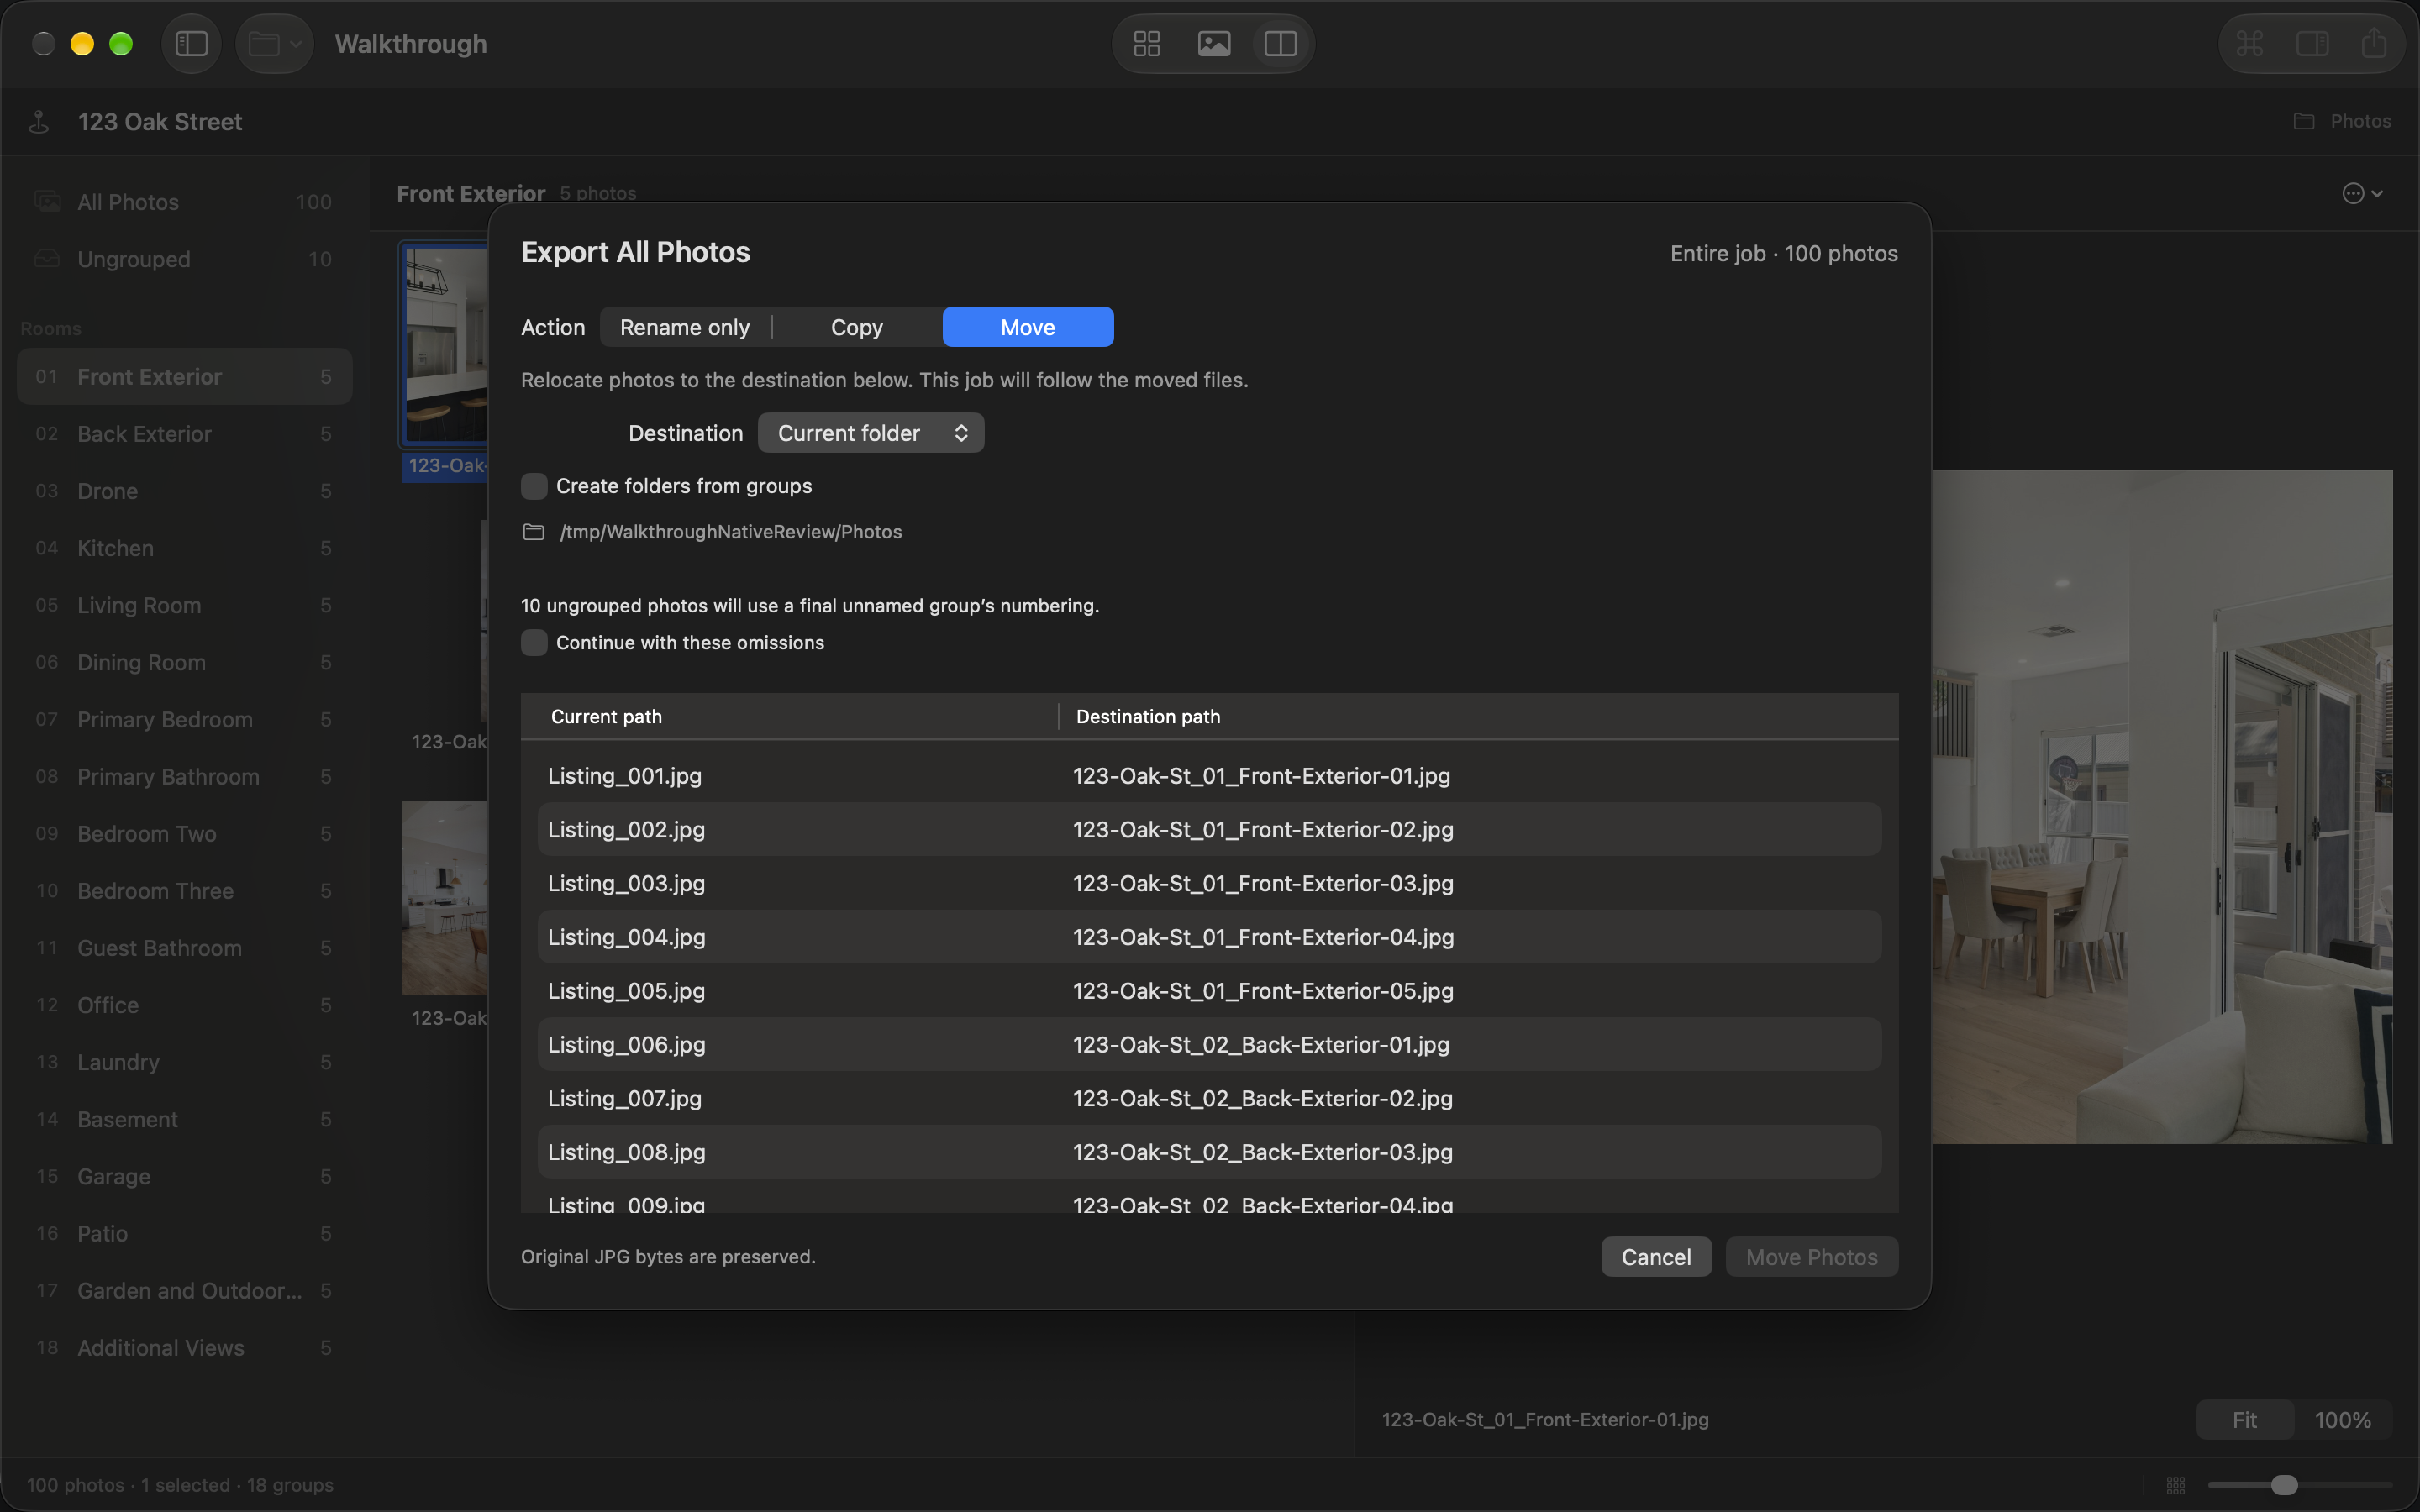
Press E, ⇧⌘E, or choose Export. Export All Photos includes the entire job, regardless of the selected room or photos. Review opens with Rename only every time and applies the current filename preset in all three modes. The Current path and Destination path table has resizable columns; hover over a truncated path to see it in full.
- Rename only: changes filenames inside each photo’s current directory. It does not relocate photos or rename existing folders.
- Copy: writes the named photos to the selected output location and keeps source files. The open job follows the new copies.
- Move: relocates the photos to the selected output location. The open job follows the moved files.
Choose a location and folder layout
Copy and Move offer Current folder or Another folder, followed by Choose Destination. Create folders from groups starts enabled. Group folders sit directly below the destination, for example 01 Front Exterior and 02 Living Room. Ungrouped photos come last; unnamed groups use Group. Number prefixes distinguish identically named groups, and padding expands for larger group counts.
Turn Create folders from groups off for a flat output. After an earlier grouped export, Rename only keeps each photo in its existing directory; use Copy or Move with a flat layout to bring the output together.
Review before writing
Check every output path and resolve any conflicts. Walkthrough never overwrites existing files or silently adds suffixes. A flat copy into the source folder is blocked when its output filenames collide with the source files. Choose another destination, use group folders, or revise the format.
Missing listing details or unnamed/ungrouped photos can produce warnings that require acknowledgement. Copy and Move can be repeated when the new paths are valid. JPG bytes are preserved; exporting does not re-encode the images.
Review grouping, ordering, and naming with Undo before export. A completed export clears workspace undo history; Command-Z does not reverse a completed filesystem export. Sort delivered files by name and check their final order in the MLS or website after upload.
Reopen jobs and find moved folders
Open a recent job from the Open menu or command palette. Jobs exported into group folders reopen using their tracked paths, including nested photographs. Restore does not import unrelated files from those subfolders.
If a folder has moved outside Walkthrough, use File → Locate Job Folder. Opening an ordinary photo folder on another Mac starts a new job; local organization history does not travel with the photographs. For help, see Support.
Updated September 17, 2026. Screenshots show the redesigned Mac app with demonstration data. Photographs are repeated for the examples.